

Appearance
React Native SDK
Complete guide for integrating Linkrunner in React Native apps
RequiredInstallationInitializationUser Identification
OptionalSDK Signing ParametersSetting the Customer User IDHandle DeeplinkGetting Attribution DataSetting User DataSetting CleverTap IDRevenue TrackingEcommerce EventsTracking Custom EventsSDK Package VersionTCF Consent CollectionEnhanced Privacy ControlsUninstall Tracking
Prefer to let your AI coding agent do this? Install the Linkrunner skill and Claude Code, Cursor, GitHub Copilot, or Windsurf will wire up the SDK and deep links for you:
bash
npx @linkrunner/skills add react-nativeThen ask your agent to "integrate Linkrunner". See Linkrunner Agent Skills.
Installation
Step 1: Install the Package
bash
# Using npm
npm install rn-linkrunner

# Using yarn
yarn add rn-linkrunner
Step 2: iOS Configuration
If you're developing for iOS, follow these additional steps:
- Install pods for the package:
bash
cd ios && pod install- Add the following code to your
info.plistfile:
xml
<key>NSUserTrackingUsageDescription</key>
<string>This identifier will be used to deliver personalized ads and improve your app experience.</string>
Step 3: SKAdNetwork Configuration
To enable SKAdNetwork postback copies to be sent to Linkrunner, add the following keys to your Info.plist file:
xml
<key>NSAdvertisingAttributionReportEndpoint</key>
<string>https://linkrunner-skan.com</string>
<key>AttributionCopyEndpoint</key>
<string>https://linkrunner-skan.com</string>
For complete SKAdNetwork integration details, see the SKAdNetwork Integration Guide.
Step 4: Android Backup Configuration
For Android apps, the SDK provides backup rules to exclude Shared Preferences data from backup. This prevents the retention of the Linkrunner install ID during reinstallation, ensuring accurate detection of new installs and re-installs.
For detailed backup configuration instructions, please refer to the Android SDK Backup Configuration.
Step 5: Encrypted SharedPreferences (Android)
SDK Version Requirement: Starting from rn-linkrunner v2.10.1, the SDK automatically encrypts the credentials it stores in Android SharedPreferences (such as the install ID and other persisted SDK state). No additional configuration is required — upgrade to v2.10.1 or above to get this behavior by default.
On Android, values written by the SDK are encrypted at rest, with a hardware-protected key generated on the device and stored in the Android Keystore. The key never leaves the device and is not bundled with the SDK.
If you are upgrading from an earlier version, the SDK will transparently migrate any existing plaintext entries to the encrypted store on the next read after the upgrade — no code changes are needed on your side.
Expo Support
If you are using Expo, follow the above steps to install the required packages. After this, you will need to use development builds since the Linkrunner SDK relies on native libraries. Follow the Expo Development Builds Documentation to get started.
Google Integrated Conversion Measurement (Optional)
Prefer to let your AI coding agent do this? The React Native skill already covers ICM — adding the pod and wiring setConsent:
bash
npx @linkrunner/skills add react-nativeIntegrated Conversion Measurement (ICM) recovers Google App Campaign installs on iOS that Google cannot attribute because there is no click identifier and no IDFA to match on. Google's On-Device Measurement (ODM) SDK turns the click context into an encrypted signal that never leaves the device, and Linkrunner sends it with the install. See Google ICM for how it works.
Set this up if you run Google App Campaigns for your iOS app. Requires rn-linkrunner 3.1.0 or later.
Google keeps ODM inactive for users in the European Economic Area, the United Kingdom, and Switzerland, so ICM recovers nothing for that traffic. Elsewhere, Google reports improved coverage for iOS 14+ users.
ICM also needs an iOS link ID configured in your Google Ads integration. Google has nowhere to send the conversion without one. See Prerequisites.
Add Google's On-Device Measurement SDK (iOS)
Already using the Firebase iOS SDK 11.14.0 or later? The FirebaseAnalytics pod brings this SDK in for you. Skip this step.
rn-linkrunner does not bundle this SDK, so apps that skip ICM carry none of its weight. Add it inside your app target in ios/Podfile:
ruby
target 'YourApp' do
  # ...your existing config

  pod 'GoogleAdsOnDeviceConversion'
end
Then install the pods:
bash
cd ios && pod installCocoaPods adds the -ObjC and -lc++ linker flags for you, so there are no Build Settings to change.
Report consent
Set the values with setConsent before you call init, and again whenever the user changes their choice:
javascript
import linkrunner from "rn-linkrunner";

linkrunner.setConsent({
    isEEA: "granted",
    hasConsentForDataUsage: "granted",
    hasConsentForAdsPersonalization: "denied",
});

await linkrunner.init("YOUR_PROJECT_TOKEN");
Each signal takes "granted", "denied", or "unknown". Anything omitted or left "unknown" is dropped from the payload rather than reported as a denial, so Linkrunner never reports a choice your user did not make.
| Parameter | Meaning |
|---|---|
isEEA | European regulations apply to this user (the EEA, the UK, or Switzerland) |
hasConsentForDataUsage | The user agreed to their data being sent to Google for advertising |
hasConsentForAdsPersonalization | The user agreed to their data being used to personalize ads |
Google treats these as required whenever their value is known. hasConsentForDataUsage decides whether Google may use the conversion at all, hasConsentForAdsPersonalization decides whether it may feed audiences and remarketing, and isEEA tells Google which rules apply. Set them from your app's real consent state rather than hardcoding them. For users outside the EEA, the UK, and Switzerland, report isEEA as denied and leave the other two unset. See Send Consent.
setConsent works on both iOS and Android. Android has no ODM SDK to add, but its installs reach Google through the App Conversion API, which reads the same signals.
That is the whole integration. The native SDK fetches the value at initialization and there is no other API to call. Attribution comes back through getAttributionData as usual.
Consent is stored between launches. Call setConsent again whenever the user's consent state changes, otherwise the previous value keeps being sent after the user has withdrawn it.
Verifying your setup
Initialize with debug mode on and look for this line in the Xcode console:
Linkrunner: odm_available=true odm_fetch_result=success odm_fetch_latency_ms=124odm_available=false with odm_fetch_result=unavailable means Google's SDK is not linked. Check that pod install picked up GoogleAdsOnDeviceConversion.
Initialization (Required)
To initialize the Linkrunner SDK, add this code to your App.tsx component:
You can find your project token here.
Note: The initialization method doesn't return any value. To get attribution data and deeplink information, use the getAttributionData method.
javascript
import linkrunner from "rn-linkrunner";

// Inside your React component
useEffect(() => {
    init();
}, []); // Empty dependency array ensures it runs only once

const init = async () => {
    await linkrunner.init(
        "YOUR_PROJECT_TOKEN",
        "YOUR_SECRET_KEY", // Optional: Required for SDK signing
        "YOUR_KEY_ID", // Optional: Required for SDK signing
        false, // Optional: Set to true to disable IDFA collection for iOS devices (defaults to false)
        true // Optional: Enable debug mode for development (defaults to false)
    );
    console.log("Linkrunner initialized");
};
SDK Signing Parameters (Optional)
For enhanced security, the LinkRunner SDK requires the following signing parameters during initialization:
secretKey: A unique secret key used for request signing and authenticationkeyId: A unique identifier for the key pair used in the signing process
You can find your project token, secret key, and key ID here.
Setting the Customer User ID
Use setCustomerUserId to attach your own user identifier to the device right after init. Once set, the identifier is stored securely on-device and automatically included in every event you track, so you never have to pass it on each trackEvent call.
Call it as early as the user's ID is available. This guarantees every event carries a user_id from the very first event, and is especially useful for existing users who were already onboarded before this feature shipped.
Available from React Native SDK v2.11.0.
Best practice: set the Customer User ID as early as possible. The user_id is only attached to events tracked after it's set, and is not applied retroactively. Use a stable, unique identifier from your own system (for example your internal user ID or a UUID) rather than an email address or other PII.
javascript
const setCustomerUserId = async () => {
    try {
        await linkrunner.setCustomerUserId("f47ac10b-58cc-4372-a567-0e02b2c3d479"); // Your unique customer user ID (e.g. a UUID)
        console.log("Customer user id set");
    } catch (error) {
        console.error("Error setting customer user id:", error);
    }
};
The identifier is stored securely on-device and persists across app restarts. Calling setCustomerUserId again with a different identifier updates the stored value; passing the same identifier is a no-op. signup() / setUserData() also update it.
User Identification (Required)
Call the signup method as soon as the user is identified — whether through signup or login. This is the moment Linkrunner ties the install (and any future events) to a user identifier.
It is strongly recommended to use the integrated platform's identify function to set a persistent user_id once it becomes available (typically after signup or login).
- Mixpanel - ID Management & User Identification
- PostHog - How User Identification Works
- Amplitude - Identify Users Documentation
If the platform's identifier function is not called, you must provide a user identifier for Mixpanel, PostHog, and Amplitude integration.
- mixpanel_distinct_id for Mixpanel
- posthog_distinct_id for PostHog
- amplitude_device_id for Amplitude
javascript
const onSignup = async () => {
    try {
        await linkrunner.signup({
            user_data: {
                id: "123", // Required: User ID
                name: "John Doe", // Optional
                phone: "9876543210", // Optional
                email: "user@example.com", // Optional
                // These properties are used to track reinstalls
                user_created_at: "2024-01-01T00:00:00Z", // Optional
                is_first_time_user: true, // Optional
                mixpanel_distinct_id: "mixpanel_distinct_id", // Optional - Mixpanel Distinct ID
                amplitude_device_id: "amplitude_device_id", // Optional - Amplitude User ID
                posthog_distinct_id: "posthog_distinct_id", // Optional - PostHog Distinct ID
            },
            data: {}, // Optional: Any additional data
        });
        console.log("Signup successful");
    } catch (error) {
        console.error("Error during signup:", error);
    }
};
Handle Deeplink
To enable remarketing and reattribution, you need to capture deep links and pass them to the Linkrunner SDK. This allows Linkrunner to detect returning users who open the app via a deep link.
javascript
import { useEffect } from 'react';
import { Linking } from 'react-native';
import linkrunner from 'rn-linkrunner';

function App() {
  useEffect(() => {
    // Cold start — app was launched by a deeplink
    Linking.getInitialURL().then((url) => {
      if (url) {
        linkrunner.handleDeeplink(url);
      }
    });

    // Warm start — app was in background, deeplink brought it to foreground
    const subscription = Linking.addEventListener('url', ({ url }) => {
      linkrunner.handleDeeplink(url);
    });

    return () => subscription.remove();
  }, []);

  return (
    // your app content
  );
}
Linkrunner sends the updated deeplink back after processing. For Linkrunner campaign links, use the returned deeplink as the resolved destination instead of the original tracking URL.
json
{
    "deeplink": "https://app.yourdomain.com/product/123"
}
Getting Attribution Data
Using Amplitude for install or pre-login onboarding reports? Send attribution from your app before tracking those events. The automatic signup integration does not add campaign properties to earlier events.
To get attribution data and deeplink information for the current installation, use the getAttributionData function:
javascript
const getAttributionInfo = async () => {
    try {
        const attributionData = await linkrunner.getAttributionData();
        console.log("Attribution data:", attributionData);
    } catch (error) {
        console.error("Error getting attribution data:", error);
    }
};
The getAttributionData function returns:
typescript
{
    deeplink?: string;
    campaignData?: {
        id: string;
        name: string;
        type: string; // "ORGANIC" | "INORGANIC"
        adNetwork?: string | null; // "META" | "GOOGLE" | "APPLE_SEARCH_ADS" | "TIKTOK" | "SNAPCHAT" | null
        installedAt: string;
        storeClickAt?: string | null;
        groupName?: string;
        assetName?: string;
        assetGroupName?: string;
        adNetworkCampaignId?: string | null; // Ad network campaign ID
        adSetId?: string | null; // Ad set ID
        adSetName?: string | null; // Ad set name
        adCreativeId?: string | null; // Ad creative ID
        adCreativeName?: string | null; // Ad creative name
    }
}
Example response:
json
{
    "deeplink": "https://app.yourdomain.com/product/123",
    "campaignData": {
        "id": "camp_123",
        "name": "Summer Sale 2024",
        "type": "INORGANIC",
        "adNetwork": "META",
        "installedAt": "2024-03-20T10:30:00Z",
        "storeClickAt": "2024-03-20T10:29:45Z",
        "groupName": "iOS Campaign",
        "assetName": "Banner Ad 1",
        "assetGroupName": "Product Catalog",
        "adNetworkCampaignId": "120214682829390250",
        "adSetId": "120214682829640250",
        "adSetName": "Productivity",
        "adCreativeId": "120214682926100250",
        "adCreativeName": "Static_2"
    }
}
Setting User Data
Call setUserData each time the app opens and the user is logged in:
setUserData is optional and is not a replacement for signup. Always call signup first as soon as the user is identified (signup or login). Use setUserData afterwards only when additional user details become available later — for example, when the user adds a phone number, email, or completes their profile after identification.
javascript
const setUserData = async () => {
    await linkrunner.setUserData({
        id: "123", // Required: User ID
        name: "John Doe", // Optional
        phone: "9876543210", // Optional
        email: "user@example.com", // Optional
        mixpanel_distinct_id: "mixpanel_distinct_id", // Optional - Mixpanel Distinct ID
        amplitude_device_id: "amplitude_device_id", // Optional - Amplitude User ID
        posthog_distinct_id: "posthog_distinct_id", // Optional - PostHog Distinct ID
    });
};
Setting CleverTap ID
Use the setAdditionalData method to set CleverTap ID:
javascript
const setIntegrationData = async () => {
    await linkrunner.setAdditionalData({
        clevertapId: "YOUR_CLEVERTAP_USER_ID", // CleverTap user identifier
    });
};
Parameters for linkrunner.setAdditionalData
clevertapId: string (optional) - CleverTap user identifier
This method allows you to connect user identities across different analytics and marketing platforms.
Revenue Tracking
Capture Payment
Use this method to capture payment information:
js
const capturePayment = async () => {
  await linkrunner.capturePayment({
    amount: 100, // Payment amount
    userId: "user123", // User identifier
    paymentId: "payment456", // Required: Unique payment identifier
    type: "FIRST_PAYMENT", // Optional: Payment type
    status: "PAYMENT_COMPLETED", // Optional: Payment status
    eventData: {
      // Optional: Ecommerce/custom event data
      content_ids: ["product_123"],
      content_type: "product",
      currency: "USD",
      value: 99.99,
      num_items: 1,
      order_id: "order_12345",
      contents: [
        {
          id: "product_123",
          quantity: 1,
          item_price: 99.99,
        },
      ],
    },
  });
};
Parameters for linkrunner.capturePayment
amount: number (required) - The payment amountuserId: string (required) - Identifier for the user making the paymentpaymentId: string (required) - Unique identifier for the payment, used to deduplicate transactionstype: string (optional) - Type of payment. Available options:FIRST_PAYMENT- First payment made by the userWALLET_TOPUP- Adding funds to a walletFUNDS_WITHDRAWAL- Withdrawing fundsSUBSCRIPTION_CREATED- New subscription createdSUBSCRIPTION_RENEWED- Subscription renewalONE_TIME- One-time paymentRECURRING- Recurring paymentDEFAULT- Default type (used if not specified)
status: string (optional) - Status of the payment. Available options:PAYMENT_INITIATED- Payment has been initiatedPAYMENT_COMPLETED- Payment completed successfully (default if not specified)PAYMENT_FAILED- Payment attempt failedPAYMENT_CANCELLED- Payment was cancelled
eventData: object (optional) - Key-value pairs for additional event data, including ecommerce properties for Meta and Google.
Removing Payments
Remove payment records (for refunds or cancellations):
javascript
const removePayment = async () => {
    await linkrunner.removePayment({
        userId: "user123", // User identifier
        paymentId: "payment456", // Optional: Unique payment identifier
    });
};
Parameters for Linkrunner.removePayment
userId: String (required) - Identifier for the user whose payment is being removedpaymentId: String (optional) - Unique identifier for the payment to be removed
Note: userId is always required. paymentId is optional, and if you omit it all payments for that user are removed.
Ecommerce Events
Minimum SDK Version: Ecommerce Event Manager requires
rn-linkrunnerv2.7.0 or above. Please ensure your SDK is updated before using this feature.
If you are tracking Ecommerce events to sync with Meta or Google, you must format your eventData to include the required fields. You also need to map your custom event to the standard commerce event in the Linkrunner Dashboard.
For detailed explanations of the required fields like content_ids, contents, and value, refer to our Meta Commerce Manager documentation or Google Commerce Manager documentation.
Add To Cart Example
Use the trackEvent method to send an AddToCart event:
javascript
const trackAddToCart = async () => {
  try {
    await linkrunner.trackEvent(
      "add_to_cart", // Map this custom event to "AddToCart" (Meta) or "add_to_cart" (Google) in the Linkrunner Dashboard. See: /ecommerce-manager/meta-commerce-manager, /ecommerce-manager/google-commerce-manager
      {
        content_ids: ["product_123"],
        contents: [
          {
            id: "product_123", // Matches content_ids
            quantity: 1,
            item_price: 49.99,
          },
        ],
        content_type: "product",
        currency: "USD",
        value: 49.99,
        num_items: 1,
      },
    );
    console.log("Add To Cart event tracked successfully");
  } catch (error) {
    console.error("Error tracking Add To Cart event:", error);
  }
};
View Content Example
Use the trackEvent method to send a ViewContent event:
javascript
const trackViewContent = async () => {
  try {
    await linkrunner.trackEvent(
      "view_item", // Map this custom event to "ViewContent" (Meta) or "view_item" (Google) in the Linkrunner Dashboard. See: /ecommerce-manager/meta-commerce-manager, /ecommerce-manager/google-commerce-manager
      {
        content_ids: ["product_123"],
        contents: [
          {
            id: "product_123", // Matches content_ids
            quantity: 1,
            item_price: 49.99,
          },
        ],
        content_type: "product",
        currency: "USD",
        value: 49.99,
        num_items: 1,
      },
    );
    console.log("View Content event tracked successfully");
  } catch (error) {
    console.error("Error tracking View Content event:", error);
  }
};
Payment / Purchase Example
Use the capturePayment method to send a Purchase event containing the ecommerce payload:
javascript
const capturePurchase = async () => {
  try {
    await linkrunner.capturePayment({
      amount: 49.99,
      userId: "user123",
      paymentId: "payment_456",
      type: "FIRST_PAYMENT", // Map this payment type to "Purchase" (Meta) or "ecommerce_purchase" (Google) in the Linkrunner Dashboard. See: /ecommerce-manager/meta-commerce-manager, /ecommerce-manager/google-commerce-manager
      status: "PAYMENT_COMPLETED",
      eventData: {
        content_ids: ["product_123"],
        contents: [
          {
            id: "product_123", // Matches content_ids
            quantity: 1,
            item_price: 49.99,
          },
        ],
        content_type: "product",
        currency: "USD",
        value: 49.99,
        num_items: 1,
        order_id: "order_abc123", // Required for Purchase events
      },
    });
    console.log("Purchase captured successfully");
  } catch (error) {
    console.error("Error capturing purchase:", error);
  }
};
Note: For more information on testing and verifying your ecommerce events, please see our Meta Commerce Manager or Google Commerce Manager guide.
Tracking Custom Events
From React Native SDK v2.11.0, custom events automatically include the user_id you set during signup() / setUserData(). The SDK stores this identifier securely on-device and attaches it to every trackEvent call, so you no longer need to pass it manually. Events tracked before signup are sent without a user_id.
Events are stored for all users, including organic ones. Events from users with no matching click are stored without campaign attribution. Call .signup so events are linked to a user. You can verify your events are being captured on the Events page. For capturing revenue, it is recommended to use the .capturePayment method instead of .trackEvent.
Track custom events in your app:
javascript
const trackEvent = async () => {
    await linkrunner.trackEvent(
        "purchase_initiated", // Event name
        { product_id: "12345", category: "electronics", amount: 99.99 }, // Optional: Event data, include amount as a number for revenue sharing with ad networks like Google and Meta
        "order_12345" // Optional: Your own unique event identifier (string or number)
    );
};
Parameters for linkrunner.trackEvent
eventName: string (required) - Name of the event to trackeventData: object (optional) - Key-value pairs for additional event data, including Meta ecommerce propertieseventId: string | number (optional) - Your own unique identifier for the event, useful for deduplication and correlating with your backend
Revenue Sharing with Ad Networks
To enable revenue sharing with ad networks like Google Ads and Meta, include an amount parameter as a number in your custom event data. This allows the ad networks to optimize campaigns based on the revenue value of conversions:
javascript
const trackPurchaseEvent = async () => {
    await linkrunner.trackEvent("purchase_completed", {
        product_id: "12345",
        category: "electronics",
        amount: 149.99, // Revenue amount as a number
    });
};
For revenue sharing with ad networks to work properly, ensure the amount parameter is passed as a number, not as a string.
SDK Package Version
Use linkrunner.getPackageVersion() in diagnostics when you need the installed rn-linkrunner package version.
TCF Consent Collection
On iOS, use linkrunner.enableTCFConsentCollection(true) only if you use an IAB TCF-compliant consent management platform and choose to let the SDK read its consent signals. Call it on every launch before init; the setting is not persisted. Explicit values passed to setConsent take precedence. This method has no effect on Android.
Enhanced Privacy Controls
The SDK offers options to enhance user privacy:
javascript
// Enable PII (Personally Identifiable Information) hashing
linkrunner.enablePIIHashing(true);
When PII hashing is enabled, sensitive user data like name, email, and phone number are hashed using SHA-256 before being sent to Linkrunner servers.
Uninstall Tracking
Before you begin
Here's what you need to know before getting started:
Requirements:
- React Native SDK 2.8.0 and later
- Firebase in your React Native project (Android)
- Registering your app with APNs (iOS)
Android
Connect Firebase Cloud Messaging (FCM) with Linkrunner
FCM HTTP v1 API
To configure FCM HTTP V1 for uninstalls:
Enable the FCM API:
- Go to the FCM console.
- Select a project.
- Go to Project Overview > Project settings.
- Copy the Project ID. This will be required in a later step.
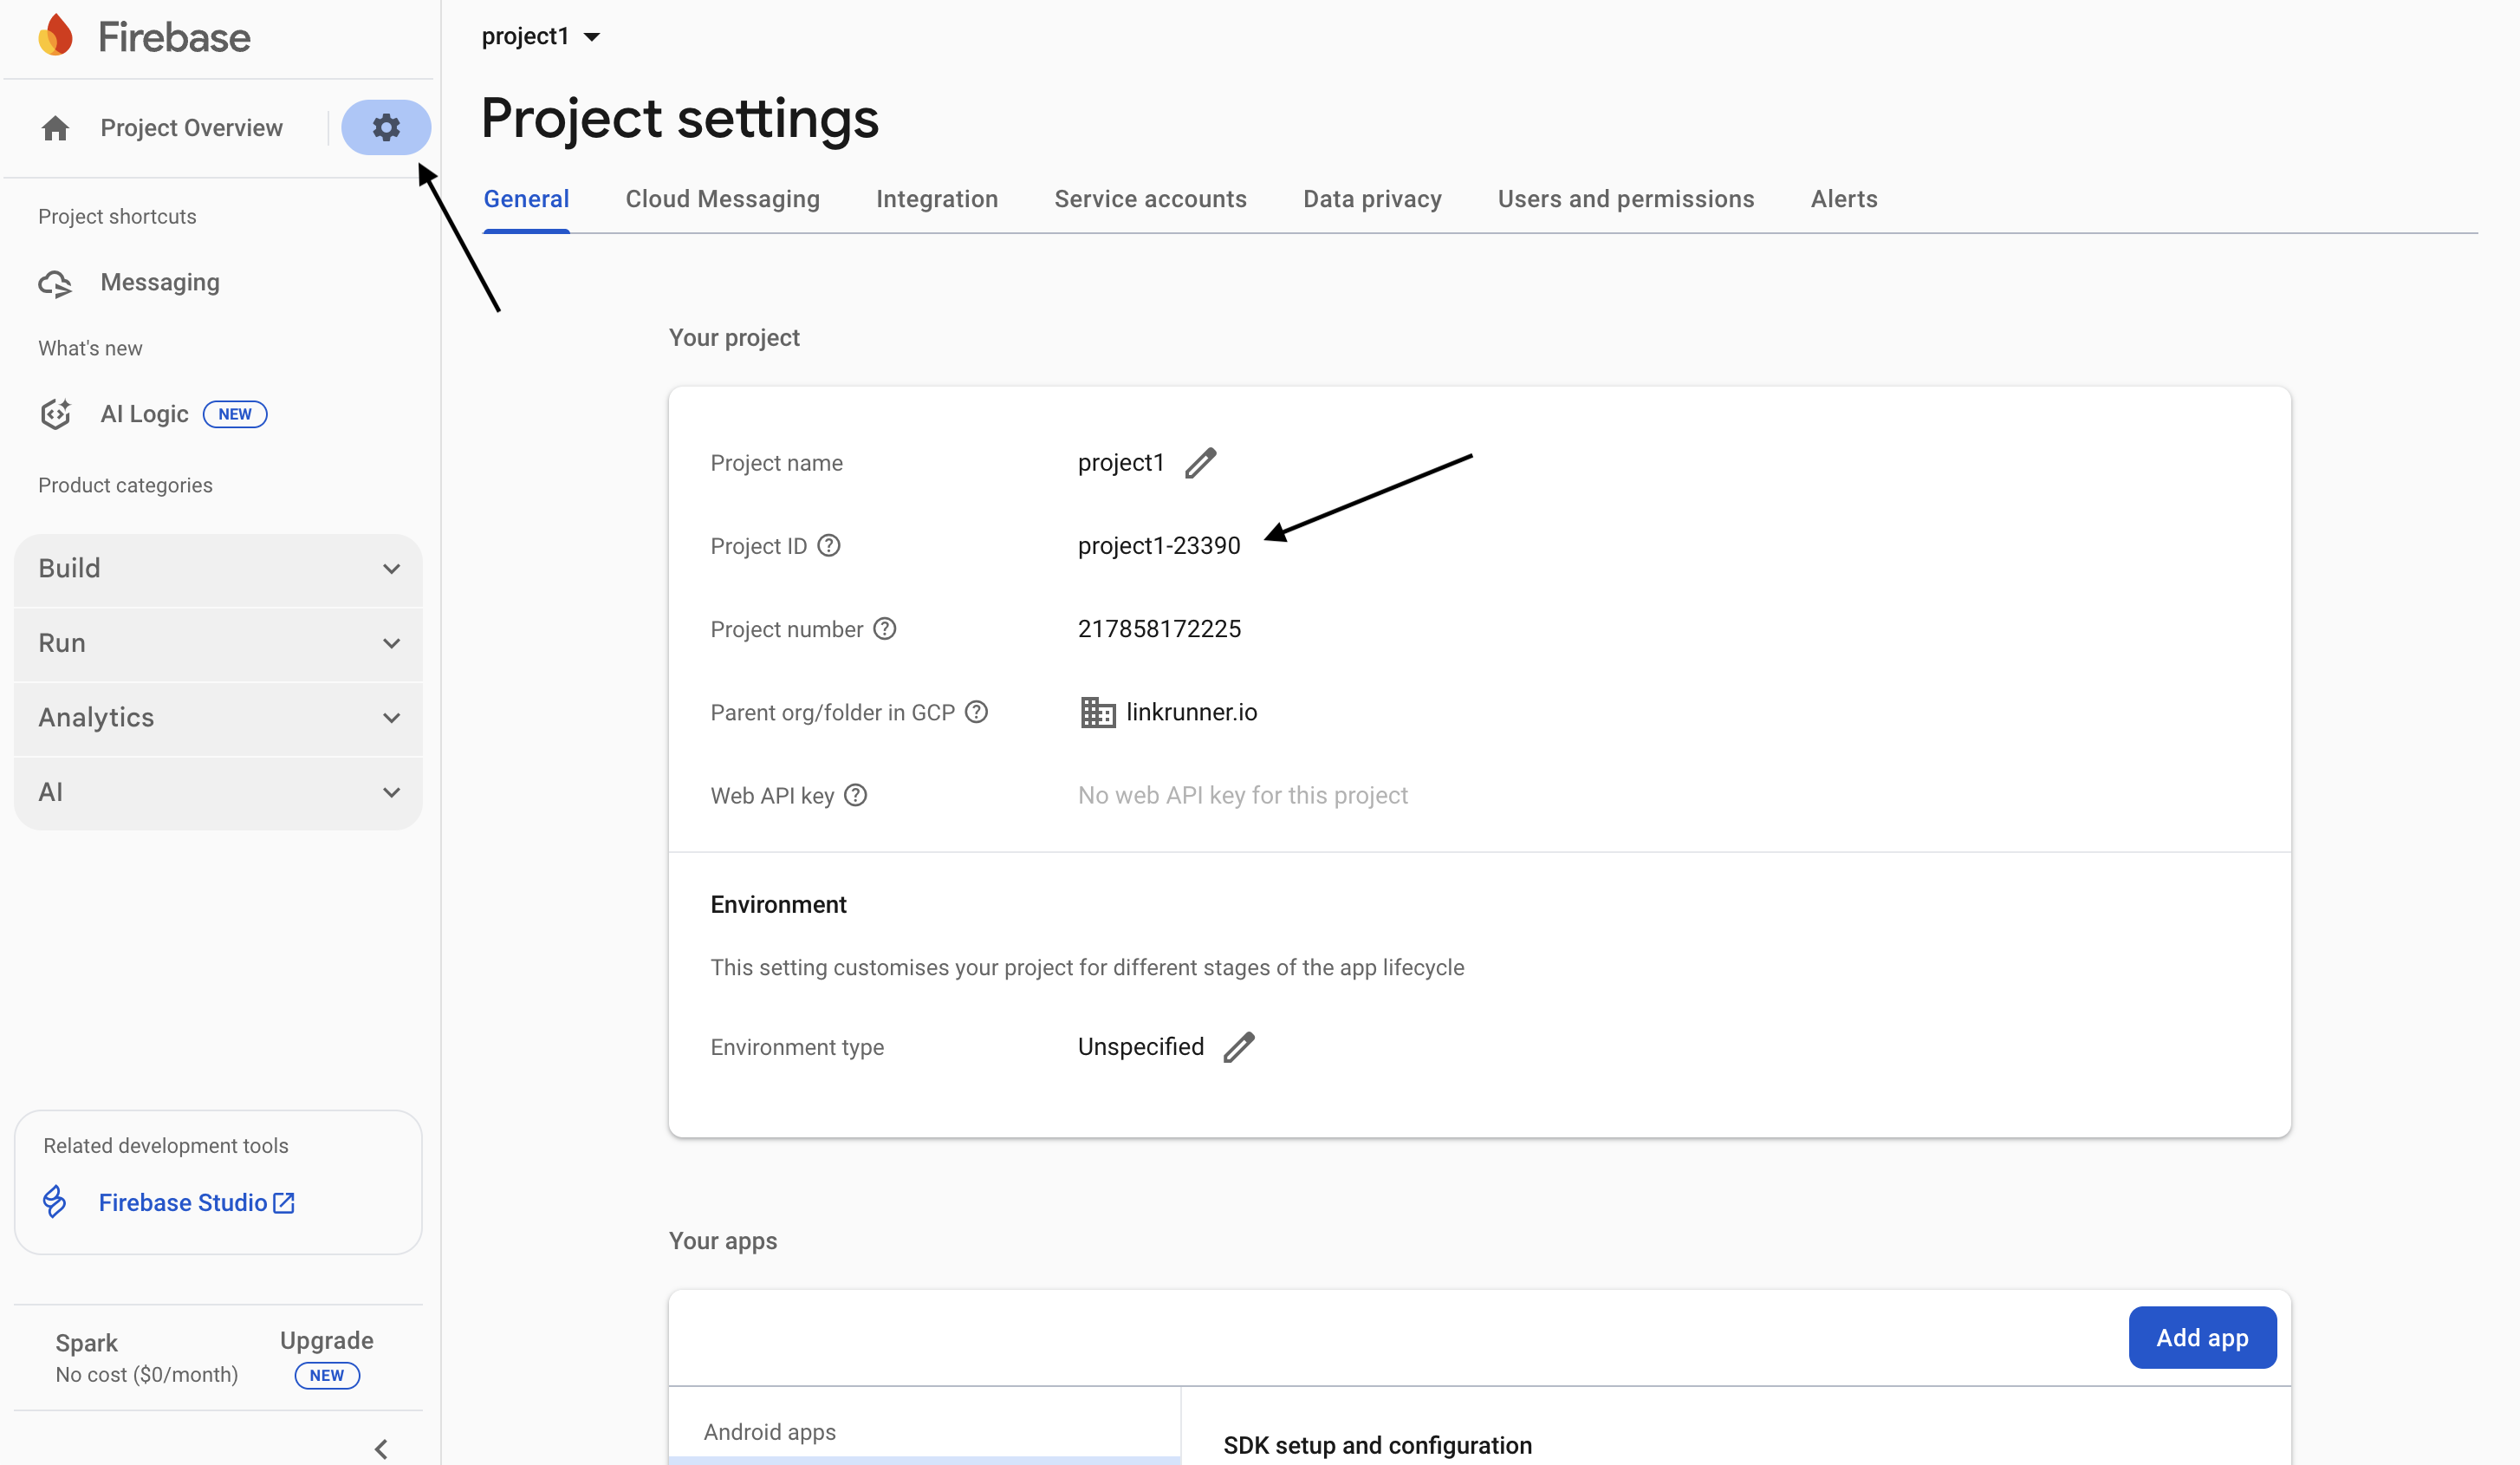
- Go to the Cloud Messaging tab.
- Make sure that Firebase Cloud Messaging API (V1) is set to Enabled.
Create a custom role for Linkrunner Uninstall:
- Go to the Service accounts tab.
- Click Manage service account permissions.
- A new browser tab opens in Google Cloud Platform.
- In the side menu, select Roles.
- Click + Create role.
- Enter the following details:
- Title: Linkrunner Uninstalls
- ID: lr_uninstalls
- Role launch stage: General availability
- Click + Add permissions.
- In Enter property name or value field, enter
cloudmessaging.messages.createand select it from the search results.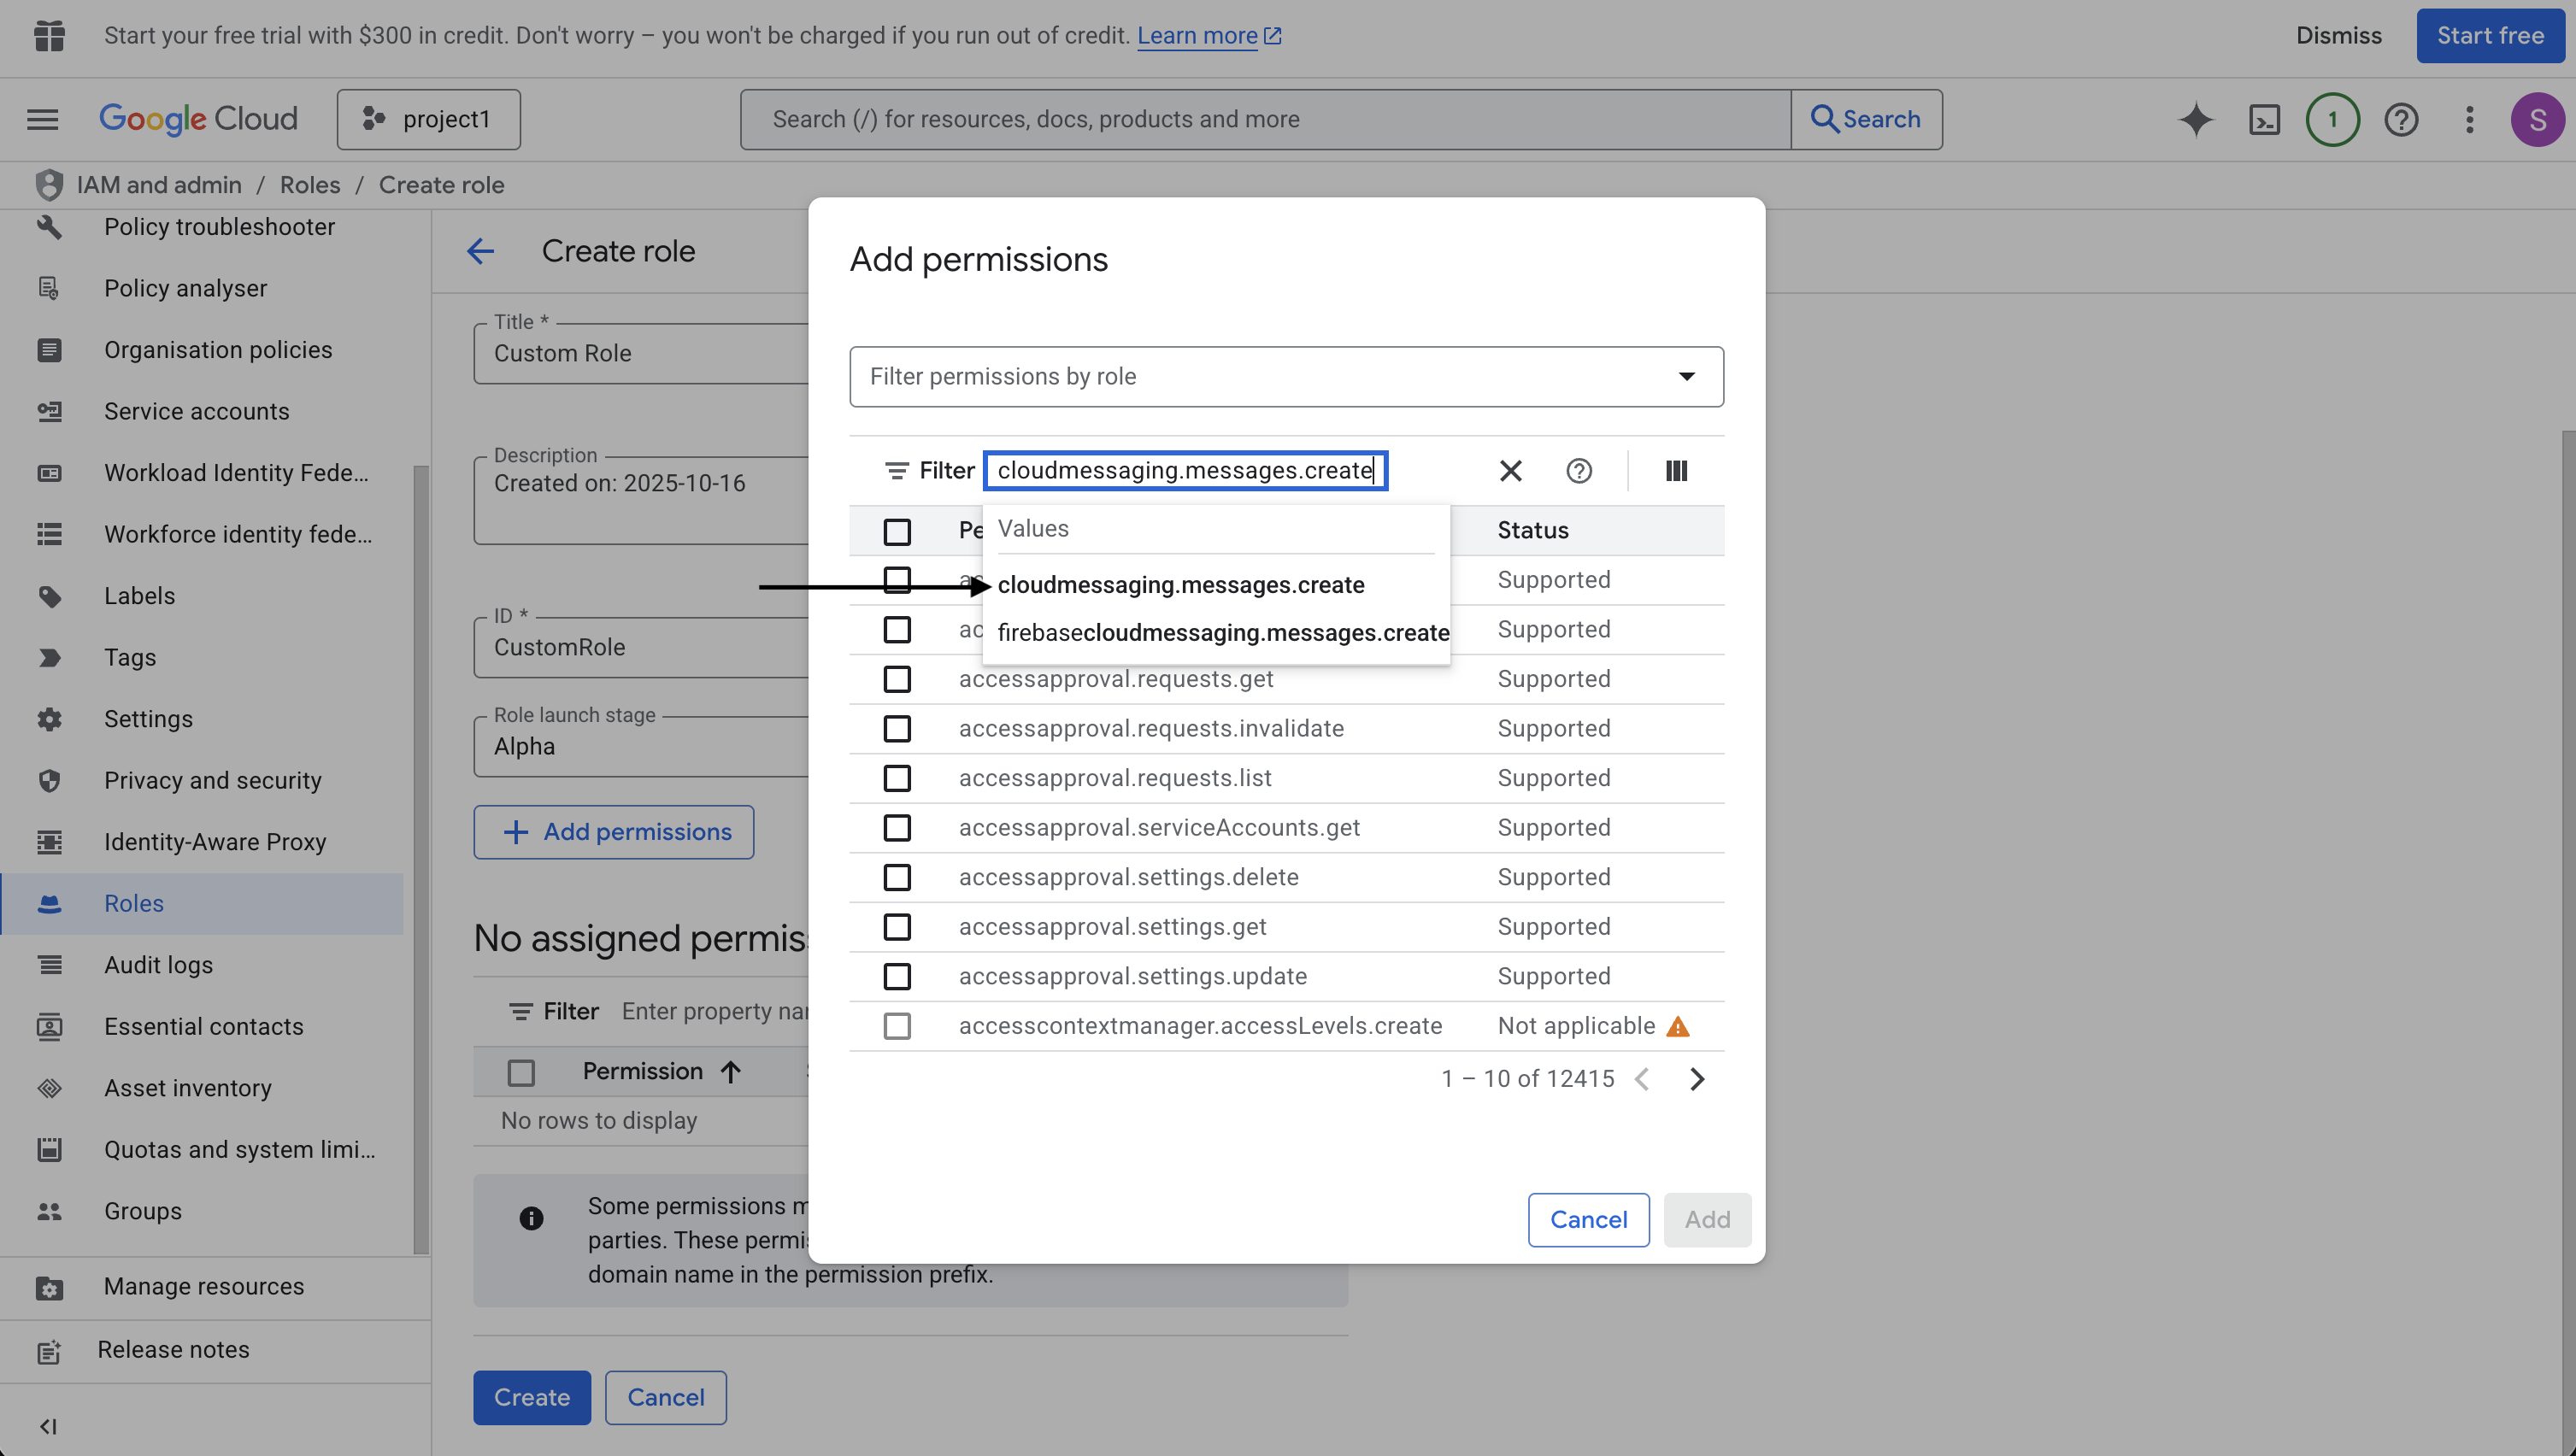
- Check the cloudmessaging.messages.create option and click Add.
- Click Create.
Assign Linkrunner the FCM uninstall role:
- In the side menu, select IAM.
- Open the View by Principals tab.
- Click Grant Access.
- In Add Principals -> New principals field, enter
lr-uninstalls-tracking@lr-uninstalls-tracking.iam.gserviceaccount.com - In Assign Roles -> Select a role field, enter
Linkrunner Uninstallsand select it from the search results. - Click Save.
The Linkrunner service account has been assigned the role of Linkrunner Uninstalls.
Linkrunner Dashboard
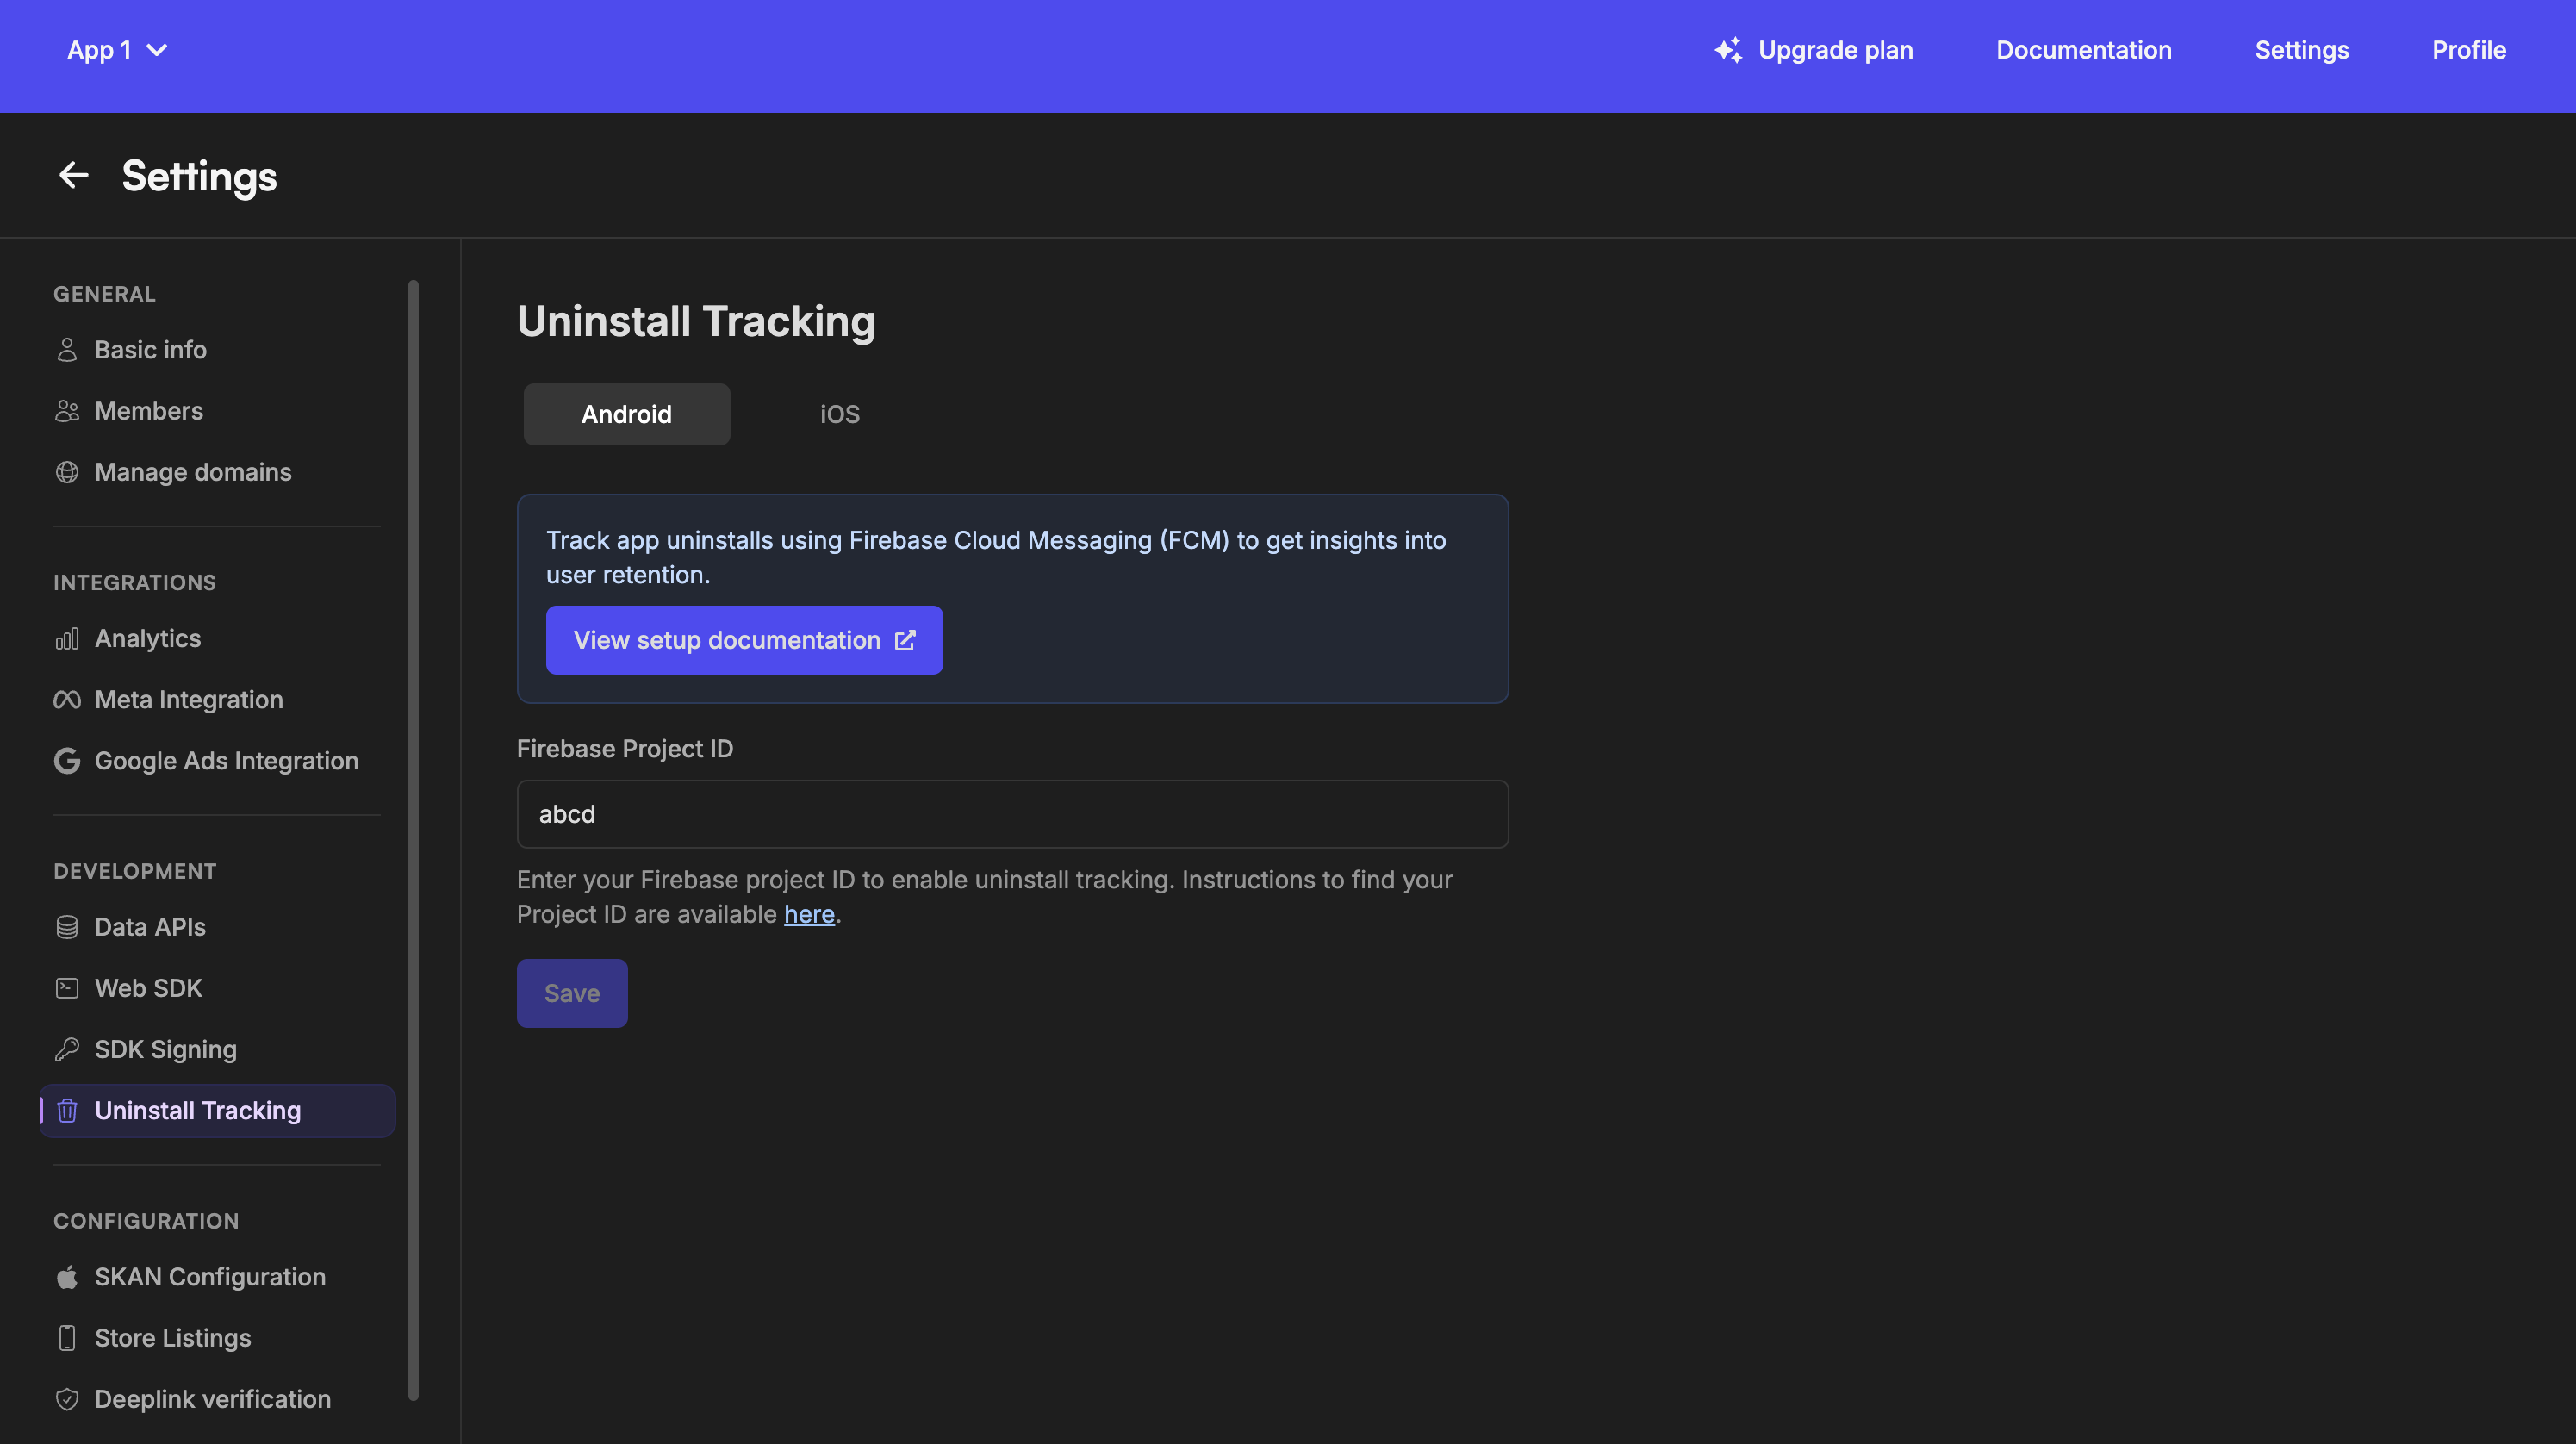
- In Linkrunner, go to Settings > Uninstall Tracking.
- Under the Android tab, enter the Firebase Project ID that you copied initially and click Save.
Integrate with Linkrunner SDK
Follow these instructions to integrate FCM with the Linkrunner SDK:
- Set up Firebase Cloud Messaging:
Set up Firebase Cloud Messaging in your React Native app. See the React Native Firebase documentation for detailed instructions.
- Configure your app to provide the device's push token to the Linkrunner SDK.
javascript
import messaging from '@react-native-firebase/messaging';
import linkrunner from 'rn-linkrunner';

// Fetch FCM token and set in Linkrunner SDK
const initializePushToken = async () => {
    const token = await messaging().getToken();
    if (token) {
        await linkrunner.setPushToken(token);
    }
};

// Listen for token refresh
const setupTokenRefresh = () => {
    messaging().onTokenRefresh(async (token) => {
        await linkrunner.setPushToken(token);
    });
};

// Handle incoming messages
const setupMessageListener = () => {
    messaging().onMessage(async (remoteMessage) => {
        if (remoteMessage.data && remoteMessage.data['lr-uninstall-tracking']) {
            // Silent notification for uninstall tracking, ignore
            return;
        }
        // Handle other messages here
    });
};
Custom implementations of FCM's message handler can unintentionally make uninstall push notifications visible to users, disrupting the intended silent experience. To avoid this, ensure your logic checks if the message contains lr-uninstall-tracking and handles it accordingly, as shown in the code example above.
iOS
Connect APNs with Linkrunner
Apple Developer Portal
Get the required credentials from the Apple Developer Portal:
APNs Authentication Key (p8) and Key ID:
- Go to the Apple Developer Portal.
- Select Identifiers under Certificates, IDs & Profiles.
- Click on the app you want to track uninstalls for. Then, under Capabilities, search for Push Notifications and enable it.
- Under Certificates, IDs & Profiles, select Keys and click on plus (+) icon to create a key. Enable APNs when creating the key and download the key file (p8).
- The Key ID can be found in the Keys tab.
Bundle ID and Team ID:
- Under Identifiers, click on your app and you will see the Bundle ID and Team ID (App ID Prefix).
Linkrunner Dashboard
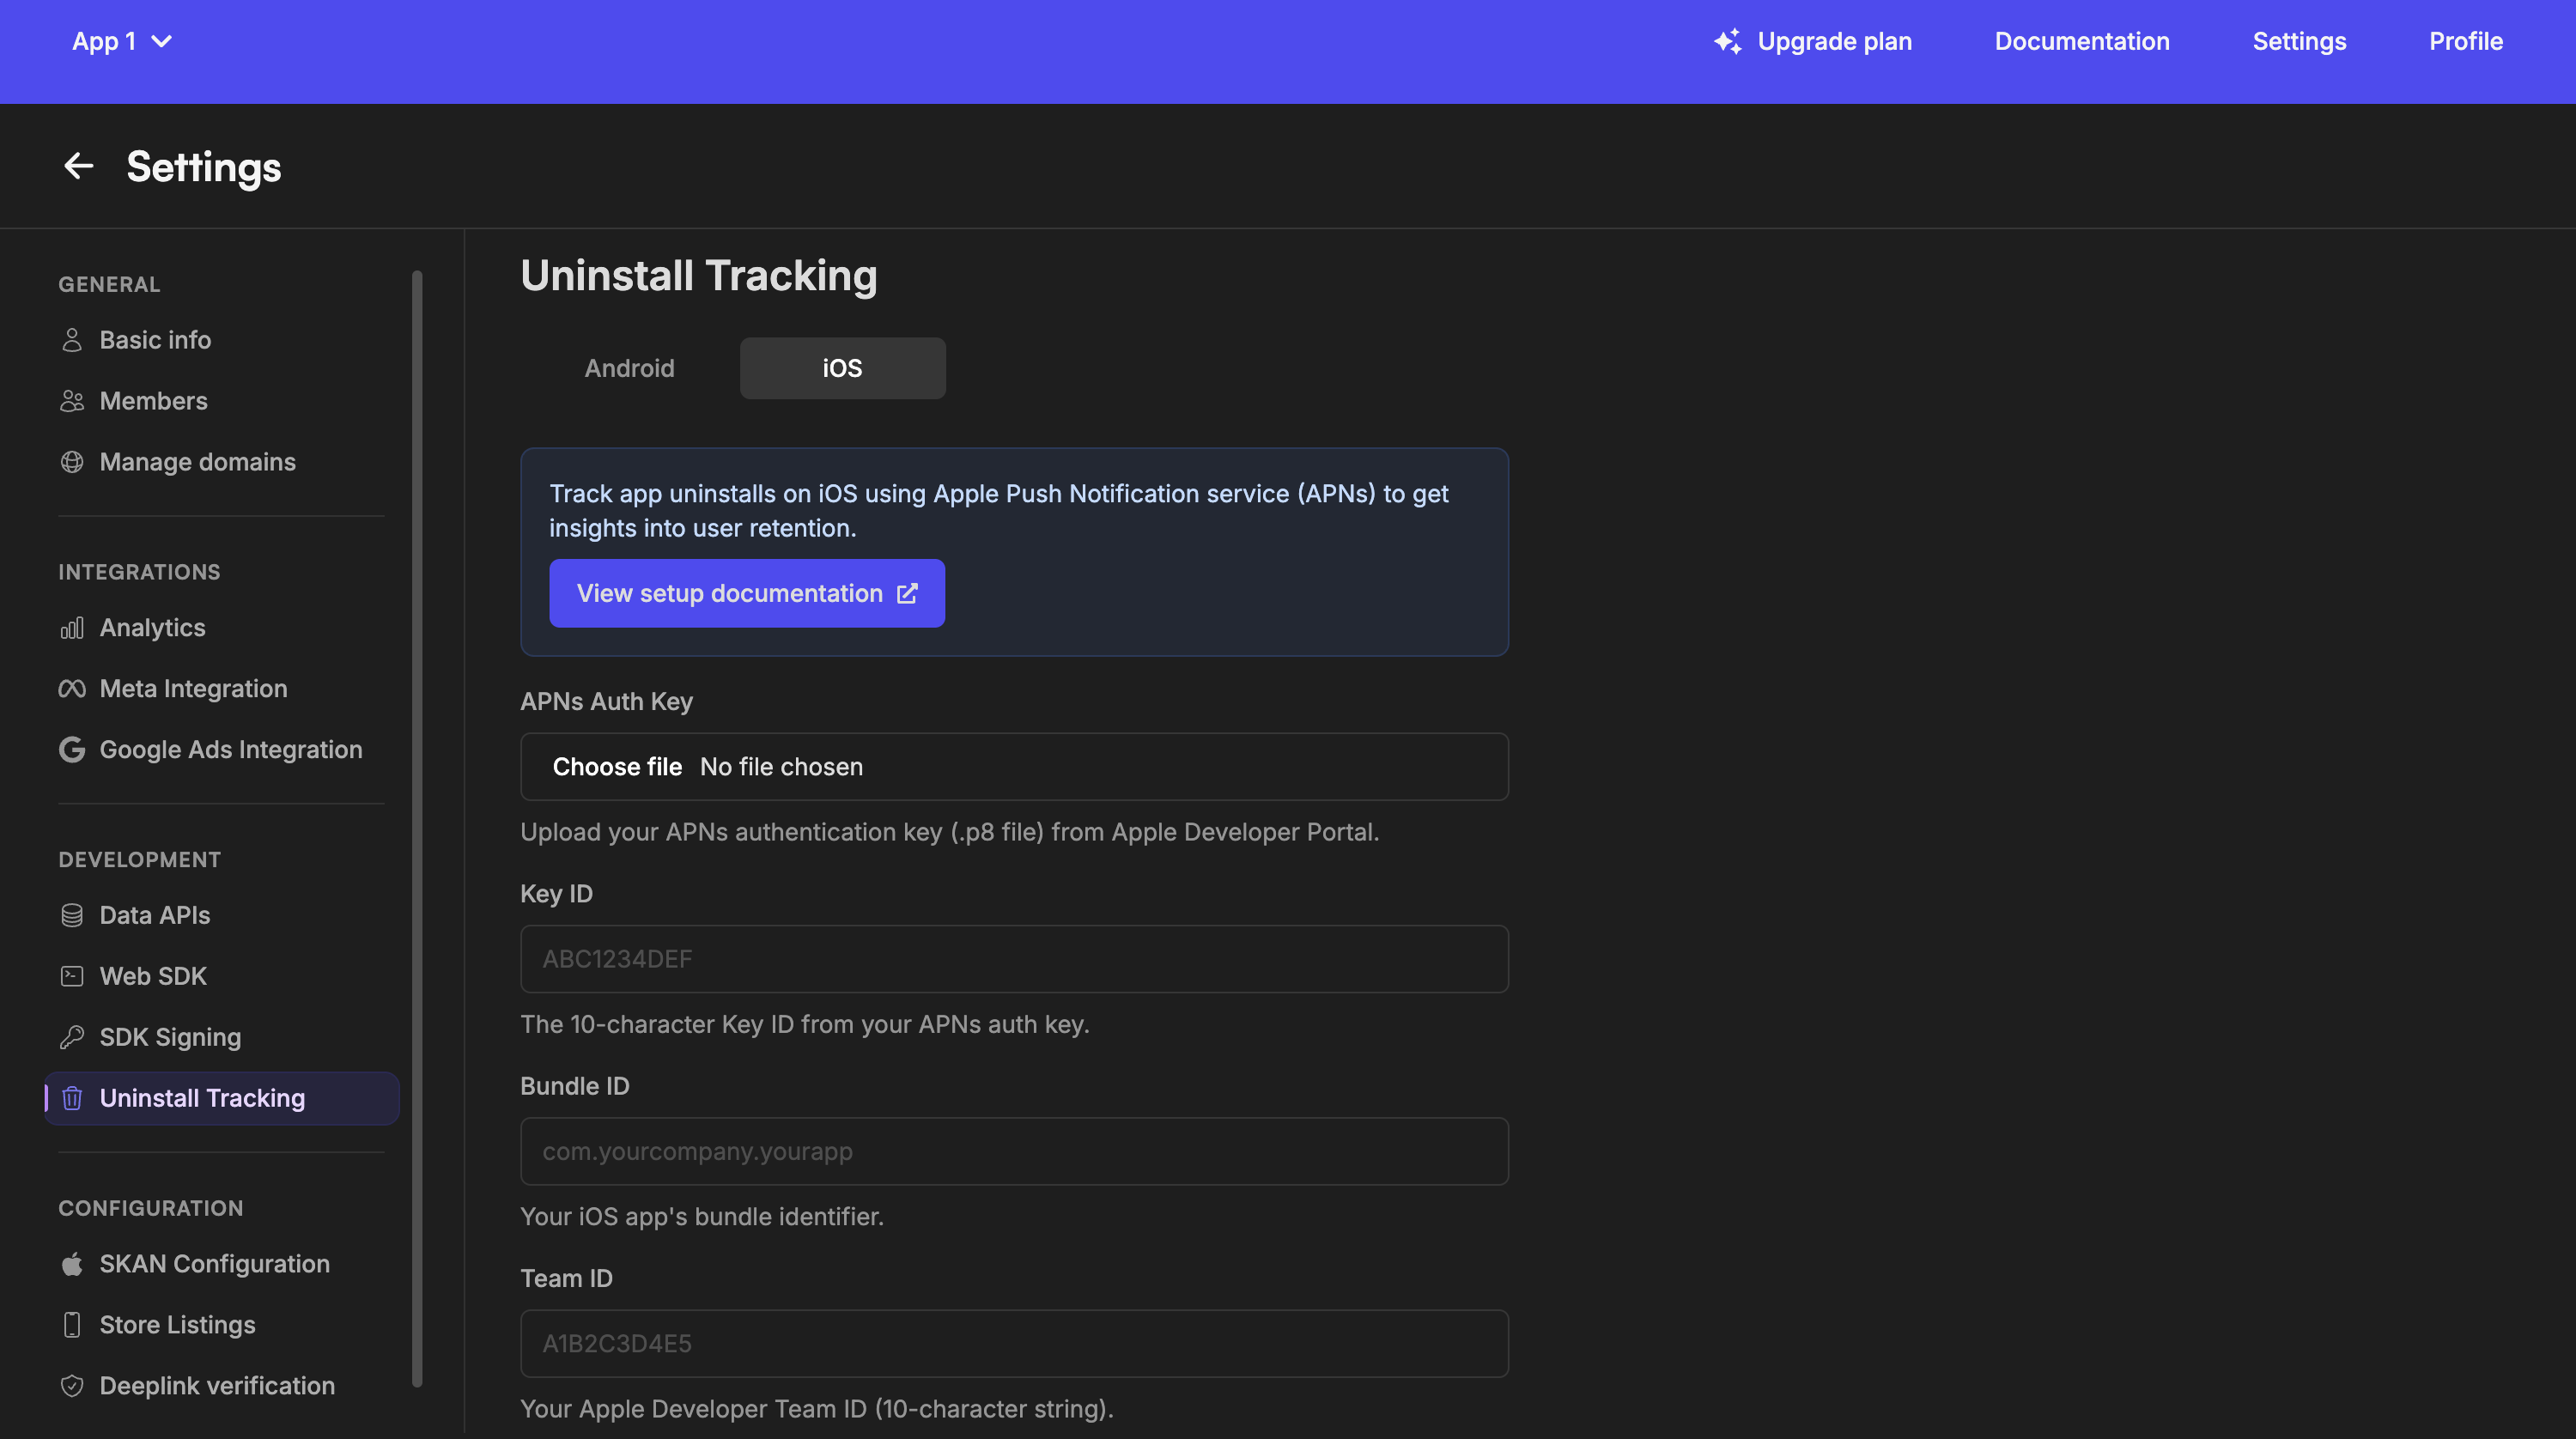
- In Linkrunner, go to Settings > Uninstall Tracking.
- Under the iOS tab, upload the APNs Authentication Key (p8) file and enter the Key ID, Bundle ID and Team ID (App ID Prefix) that you copied from the Apple Developer Portal.
Integrate with Linkrunner SDK
Follow these instructions to integrate APNs with the Linkrunner SDK:
- Set up Firebase Cloud Messaging:
Set up Firebase Cloud Messaging in your React Native app if you haven't already. See the React Native Firebase documentation for detailed instructions.
- Configure your app to provide the device's APNs token to the Linkrunner SDK.
javascript
import messaging from '@react-native-firebase/messaging';
import linkrunner from 'rn-linkrunner';
import { Platform } from 'react-native';

const initializeAPNsToken = async () => {
    if (Platform.OS === 'ios') {
        const apnsToken = await messaging().getAPNSToken();
        if (apnsToken) {
            await linkrunner.setPushToken(apnsToken);
        }
    }
};
Function Placement Guide
| Function | Requirement | Where to Place | When to Call |
|---|---|---|---|
linkrunner.init | Required | App.tsx within useEffect | Once when app starts |
linkrunner.signup | Required | Identification flow (signup or login) | Once when the user is identified |
linkrunner.setCustomerUserId | Required | After init, when your user ID is available | As early as the user's ID is available |
linkrunner.handleDeeplink | Required | Deep link entry points | When app is opened via a deep link |
linkrunner.getAttributionData | Optional | Attribution data handling flow | Whenever the attribution data is needed |
linkrunner.setAdditionalData | Optional | Integration code | When third-party integration IDs are available |
linkrunner.setUserData | Optional | Profile update flow after signup | When additional user details become available |
linkrunner.trackEvent | Optional | Throughout app, including ecommerce flows | When specific user actions occur, including AddToCart or ViewContent events |
linkrunner.capturePayment | Optional | Payment processing, including ecommerce purchases | When user makes a payment, including Purchase events with ecommerce data |
linkrunner.removePayment | Optional | Refund flow | When payment needs to be removed |
linkrunner.setPushToken | Optional | Push notification setup | When FCM/APNs token is available |
linkrunner.setConsent | Optional | App initialization or consent flow | Before init, and again when consent changes |
linkrunner.enablePIIHashing | Optional | Privacy configuration | When enabling PII hashing |
linkrunner.enableTCFConsentCollection | Optional | iOS consent configuration | On every launch before init, if you opt into TCF consent collection |
linkrunner.getPackageVersion | Optional | Diagnostics | When you need the installed SDK package version |
Next Steps
Test Your Integration
Validate your setup end-to-end
Set Up Deep Linking
Configure deep links for your app
Support
If you encounter issues during integration, contact us at support@linkrunner.io.