

Appearance
iOS SDK
Complete guide for integrating Linkrunner in native iOS apps
RequiredRequirementsInstallationInitializationUser Identification
OptionalSDK Signing ParametersSetting the Customer User IDHandle DeeplinkGetting Attribution DataSetting User DataSetting CleverTap IDRevenue TrackingTracking Custom EventsEcommerce EventsEnhanced Privacy ControlsUninstall Tracking
Prefer to let your AI coding agent do this? Install the Linkrunner skill and Claude Code, Cursor, GitHub Copilot, or Windsurf will wire up the SDK and deep links for you:
bash
npx @linkrunner/skills add iosThen ask your agent to "integrate Linkrunner". See Linkrunner Agent Skills.
Requirements
- iOS 15.0 or higher
- Swift 5.9 or higher
- Xcode 14.0 or higher
Installation
Swift Package Manager
The Linkrunner SDK can be installed via Swift Package Manager (SPM), which is integrated directly into Xcode.
- In Xcode, select File → Add Package Dependencies...
- Enter the following repository URL:
https://github.com/linkrunner-labs/linkrunner-ios.git - Select the version you want to use (we recommend using the latest version)
- Click Add Package
- Choose the library type LinkrunnerKitStatic
Alternatively, you can add the package dependency to your Package.swift file:
swift
dependencies: [
    .package(url: "https://github.com/linkrunner-labs/linkrunner-ios.git", from: "4.1.0")
]
And add the dependency to your target:
swift
targets: [
    .target(
        name: "YourApp",
        dependencies: [
            .product(name: "LinkrunnerKitStatic", package: "linkrunner-ios")
        ]
    )
]
Importing in Swift
After installation, you can import the SDK in your Swift files:
swift
import LinkrunnerKitUse import LinkrunnerKit for v3.0.0 and later. The public API remains LinkrunnerSDK.shared.
Required Permissions
App Tracking Transparency
If you plan to use IDFA (Identifier for Advertisers), you need to request permission from the user through App Tracking Transparency. Add the following to your Info.plist file:
xml
<key>NSUserTrackingUsageDescription</key>
<string>This identifier will be used to deliver personalized ads and improve your app experience.</string>
SKAdNetwork Configuration
To enable SKAdNetwork postback copies to be sent to Linkrunner, add the following keys to your Info.plist file:
xml
<key>NSAdvertisingAttributionReportEndpoint</key>
<string>https://linkrunner-skan.com</string>
<key>AttributionCopyEndpoint</key>
<string>https://linkrunner-skan.com</string>
For complete SKAdNetwork integration details, see the SKAdNetwork Integration Guide.
Network Access
The SDK requires network access to communicate with Linkrunner services. Make sure your app has the appropriate permissions for network access.
Google Integrated Conversion Measurement (Optional)
Prefer to let your AI coding agent do this? The iOS skill already covers ICM — adding Google's ODM SDK and wiring setConsent:
bash
npx @linkrunner/skills add iosIntegrated Conversion Measurement (ICM) recovers Google App Campaign installs that Google cannot attribute because there is no click identifier and no IDFA to match on. Google's On-Device Measurement (ODM) SDK turns the click context into an encrypted signal that never leaves the device, and Linkrunner sends it with the install. See Google ICM for how it works.
Set this up if you run Google App Campaigns for your iOS app. Requires LinkrunnerKit 4.1.0 or later.
Google keeps ODM inactive for users in the European Economic Area, the United Kingdom, and Switzerland, so ICM recovers nothing for that traffic. Elsewhere, Google reports improved coverage for iOS 14+ users.
ICM also needs an iOS link ID configured in your Google Ads integration. Google has nowhere to send the conversion without one. See Prerequisites.
Add Google's On-Device Measurement SDK
Already using the Firebase iOS SDK 11.14.0 or later? The FirebaseAnalytics pod brings this SDK in for you. Skip to the next step.
Linkrunner does not bundle this SDK, so apps that skip ICM carry none of its weight. Add it to your app yourself.
Add https://github.com/googleads/google-ads-on-device-conversion-ios-sdk in File → Add Package Dependencies... and select the GoogleAdsOnDeviceConversion product.
Add the -ObjC linker flag (Swift Package Manager only)
Using CocoaPods? Skip this step. CocoaPods adds -ObjC and -lc++ for you when it links Google's static framework. The one exception is an app target whose Other Linker Flags no longer contain $(inherited), in which case add -ObjC yourself.
If you added Google's SDK with Swift Package Manager, add this to Build Settings → Other Linker Flags on your app target:
-ObjCWithout it, ICM silently does nothing and your build still succeeds. Linkrunner finds Google's class through the Objective-C runtime, so nothing references it at link time, and the linker drops it from Google's static library.
Provide consent
Google reads consent signals when it matches your installs. See Consent below.
That is the whole integration. Linkrunner detects the SDK at runtime and there is no API to call. Attribution comes back through getAttributionData as usual.
ODM matches on the time of first launch, which Linkrunner records when you call initialize.
ICM complements SKAdNetwork, it does not replace it. Keep your existing SKAdNetwork integration in place.
Consent
Google needs to know whether European regulations apply to a user and what that user agreed to. Set the values with setConsent before you call initialize, and again whenever the user changes their choice.
swift
LinkrunnerSDK.shared.setConsent(
    LinkrunnerConsent(
        isEEA: .granted,
        hasConsentForDataUsage: .granted,
        hasConsentForAdsPersonalization: .denied
    )
)

await LinkrunnerSDK.shared.initialize(token: "YOUR_PROJECT_TOKEN")| Parameter | Meaning |
|---|---|
isEEA | European regulations apply to this user (the EEA, the UK, or Switzerland) |
hasConsentForDataUsage | The user agreed to their data being sent to Google for advertising |
hasConsentForAdsPersonalization | The user agreed to their data being used to personalize ads |
Each takes .granted, .denied, or .unknown. Anything left .unknown is omitted rather than reported as a denial, so Linkrunner never reports a choice your user did not make.
Google treats these as required whenever their value is known. hasConsentForDataUsage decides whether Google may use the conversion at all, hasConsentForAdsPersonalization decides whether it may feed audiences and remarketing, and isEEA tells Google which rules apply. Set them from your app's real consent state rather than hardcoding them. For users outside the EEA, the UK, and Switzerland, report isEEA as denied and leave the other two unset. See Send Consent. App Tracking Transparency is not a substitute, because it governs IDFA access only and is reported separately.
Consent is stored between launches. Call setConsent again whenever the user's consent state changes, otherwise the previous value keeps being sent after your user has withdrawn it.
Verifying your setup
Initialize with debug: true and look for this line in the Xcode console:
Linkrunner: odm_available=true odm_fetch_result=success odm_fetch_latency_ms=124odm_available=false with odm_fetch_result=unavailable means Google's SDK is not linked. On Swift Package Manager, check the -ObjC flag first, because a missing flag strips the class with no build warning.
Initialization (Required)
Initialize the Linkrunner SDK in your app's startup code, typically in your AppDelegate or SceneDelegate:
You can find your project token here.
Note: The initialization method doesn't return any value. To get attribution data and deeplink information, use the getAttributionData method.
swift
import LinkrunnerKit
import SwiftUI

@main
struct MyApp: App {
    init() {
        Task {
            await LinkrunnerSDK.shared.initialize(
                token: "YOUR_PROJECT_TOKEN",
                secretKey: "YOUR_SECRET_KEY", // Optional: Required for SDK signing
                keyId: "YOUR_KEY_ID", // Optional: Required for SDK signing
                debug: true // Optional: Enable debug mode for development (defaults to false)
            )
            print("Linkrunner initialized successfully")
        }
    }

    var body: some Scene {
        WindowGroup {
            ContentView()
        }
    }
}
SDK Signing Parameters (Optional)
For enhanced security, the LinkRunner SDK requires the following signing parameters during initialization:
secretKey: A unique secret key used for request signing and authenticationkeyId: A unique identifier for the key pair used in the signing processdisableIdfa(optional): Boolean flag to disable IDFA collection (defaults to false)debug(optional): Boolean flag to enable debug mode for development (defaults to false)
You can find your project token, secret key, and key ID here.
Setting the Customer User ID
Use setCustomerUserId to attach your own user identifier to the device right after init. Once set, the identifier is stored securely on-device and automatically included in every event you track, so you never have to pass it on each trackEvent call.
Call it as early as the user's ID is available. This guarantees every event carries a user_id from the very first event, and is especially useful for existing users who were already onboarded before this feature shipped.
Available from iOS SDK v3.11.0.
Best practice: set the Customer User ID as early as possible. The user_id is only attached to events tracked after it's set, and is not applied retroactively. Use a stable, unique identifier from your own system (for example your internal user ID or a UUID) rather than an email address or other PII.
swift
func setCustomerUserId() async {
    await LinkrunnerSDK.shared.setCustomerUserId("f47ac10b-58cc-4372-a567-0e02b2c3d479") // Your unique customer user ID (e.g. a UUID)
}
The identifier is stored in the Keychain and persists across app restarts. Calling setCustomerUserId again with a different identifier updates the stored value; passing the same identifier is a no-op. signup() / setUserData() also update it.
User Identification (Required)
Call the signup method as soon as the user is identified — whether through signup or login. This is the moment Linkrunner ties the install (and any future events) to a user identifier.
It is strongly recommended to use the integrated platform's identify function to set a persistent user_id once it becomes available (typically after signup or login).
- Mixpanel - ID Management & User Identification
- PostHog - How User Identification Works
- Amplitude - Identify Users Documentation
If the platform's identifier function is not called, you must provide a user identifier for Mixpanel, PostHog, and Amplitude integration.
- mixPanelDistinctId for Mixpanel
- amplitudeDeviceId for Amplitude
- posthogDistinctId for PostHog
swift
func onSignup() async {
    let userData = UserData(
        id: "123", // Required: User ID
        name: "John Doe", // Optional
        phone: "9876543210", // Optional
        email: "user@example.com", // Optional
        isFirstTimeUser: isFirstTimeUser,
        userCreatedAt: "2022-01-01T00:00:00Z", // Optional
        mixPanelDistinctId: "mixpanelDistinctId", // Optional - Mixpanel Distinct ID
        amplitudeDeviceId: "amplitudeDeviceId", // Optional - Amplitude Device ID
        posthogDistinctId: "posthogDistinctId" // Optional - PostHog Distinct ID
    )

    await LinkrunnerSDK.shared.signup(
        userData: userData,
        additionalData: [:] // Optional: Any additional data
    )

    print("Signup successful")
}
Handle Deeplink
To enable remarketing and reattribution, you need to capture deep links and pass them to the Linkrunner SDK. This allows Linkrunner to detect returning users who open the app via a deep link.
Add the following to your SceneDelegate.swift:
swift
class SceneDelegate: UIResponder, UIWindowSceneDelegate {
    var window: UIWindow?

    // Cold start via Universal Link
    func scene(_ scene: UIScene, willConnectTo session: UISceneSession,
               options connectionOptions: UIScene.ConnectionOptions) {
        // Check if app was launched via a Universal Link
        if let userActivity = connectionOptions.userActivities.first,
           userActivity.activityType == NSUserActivityTypeBrowsingWeb,
           let url = userActivity.webpageURL {
            Task {
                await LinkrunnerSDK.shared.handleDeeplink(url: url.absoluteString)
            }
        }

        // Check if app was launched via a custom URL scheme
        if let urlContext = connectionOptions.urlContexts.first {
            Task {
                await LinkrunnerSDK.shared.handleDeeplink(url: urlContext.url.absoluteString)
            }
        }
    }

    // Warm start — Universal Links (app already running in background)
    func scene(_ scene: UIScene, continue userActivity: NSUserActivity) {
        guard userActivity.activityType == NSUserActivityTypeBrowsingWeb,
              let url = userActivity.webpageURL else { return }

        Task {
            await LinkrunnerSDK.shared.handleDeeplink(url: url.absoluteString)
        }
    }

    // Warm start — Custom URL schemes (app already running in background)
    func scene(_ scene: UIScene, openURLContexts URLContexts: Set<UIOpenURLContext>) {
        guard let url = URLContexts.first?.url else { return }

        Task {
            await LinkrunnerSDK.shared.handleDeeplink(url: url.absoluteString)
        }
    }
}
Linkrunner sends the updated deeplink back after processing. For Linkrunner campaign links, use the returned deeplink as the resolved destination instead of the original tracking URL.
json
{
    "deeplink": "https://app.yourdomain.com/product/123"
}
Getting Attribution Data
Using Amplitude for install or pre-login onboarding reports? Send attribution from your app before tracking those events. The automatic signup integration does not add campaign properties to earlier events.
To get attribution data and deeplink information for the current installation, use the getAttributionData function:
swift
func getAttributionInfo() async {
    let attributionData = await LinkrunnerSDK.shared.getAttributionData()
    print("Attribution data:", attributionData)

    // Attribution data includes:
    // - deeplink: The deep link URL that led to app installation
    // - campaignData: Campaign information
    if let deeplink = attributionData.deeplink {
        print("Deeplink:", deeplink)
        // Handle the deeplink in your app
    }
}
swift
// getAttributionData() returns this type
public struct LRAttributionDataResponse: Codable, Sendable {
    public let deeplink: String?
    public let campaignData: CampaignData?
    public let attributionSource: String
}

public struct CampaignData: Codable, Sendable {
    public let id: String
    public let name: String
    public let type: CampaignType        // .organic ("ORGANIC") | .inorganic ("INORGANIC")
    public let adNetwork: AdNetwork?      // .meta ("META") | .google ("GOOGLE")
    public let groupName: String?
    public let assetGroupName: String?
    public let adNetworkCampaignId: String? // Ad network campaign ID
    public let adSetId: String?             // Ad set ID
    public let adSetName: String?           // Ad set name
    public let adCreativeId: String?        // Ad creative ID
    public let adCreativeName: String?      // Ad creative name
    public let assetName: String?
    public let installedAt: Date?
    public let storeClickAt: Date?
}

public enum CampaignType: String, Codable, Sendable {
    case organic = "ORGANIC"
    case inorganic = "INORGANIC"
}

public enum AdNetwork: String, Codable, Sendable {
    case meta = "META"
    case google = "GOOGLE"
}
Example response (raw values — type/adNetwork decode to enums, installedAt/storeClickAt to Date):
json
{
    "deeplink": "https://app.yourdomain.com/product/123",
    "campaignData": {
        "id": "camp_123",
        "name": "Summer Sale 2024",
        "adNetwork": "META",
        "type": "INORGANIC",
        "installedAt": "2024-03-20T10:30:00Z",
        "storeClickAt": "2024-03-20T10:29:45Z",
        "groupName": "iOS Campaign",
        "assetName": "Banner Ad 1",
        "assetGroupName": "Product Catalog",
        "adNetworkCampaignId": "120214682829390250",
        "adSetId": "120214682829640250",
        "adSetName": "Productivity",
        "adCreativeId": "120214682926100250",
        "adCreativeName": "Static_2"
    },
    "attributionSource": "META"
}
Setting User Data
Call setUserData each time the app opens and the user is logged in:
setUserData is optional and is not a replacement for signup. Always call signup first as soon as the user is identified (signup or login). Use setUserData afterwards only when additional user details become available later — for example, when the user adds a phone number, email, or completes their profile after identification.
swift
func setUserData() async {
    let userData = UserData(
        id: "123", // Required: User ID
        name: "John Doe", // Optional
        phone: "9876543210", // Optional
        email: "user@example.com" // Optional
    )

    await LinkrunnerSDK.shared.setUserData(userData)
    print("User data set successfully")
}
Setting CleverTap ID
Use setAdditionalData to add CleverTap ID to the SDK:
swift
func setAdditionalData() async {
    let integrationData = IntegrationData(
        clevertapId:clevertapId
    )

    await LinkrunnerSDK.shared.setAdditionalData(integrationData)
    print("CleverTap ID set successfully")
}
Revenue Tracking
Capturing Payments
Track payment information:
swift
func capturePayment() async {
    await LinkrunnerSDK.shared.capturePayment(
        amount: 99.99, // Payment amount
        userId: "user123", // User identifier
        paymentId: "payment456", // Required: Unique payment identifier
        type: .firstPayment, // optional
        status: .completed, // optional
        eventData: [        // Optional: Ecommerce/custom event data
            "content_ids": ["product_123"],
            "content_type": "product",
            "currency": "USD",
            "value": 99.99,
            "num_items": 1,
            "order_id": "order_12345",
            "contents": [
                [
                    "id": "product_123",
                    "quantity": 1,
                    "item_price": 99.99
                ]
            ]
        ]
    )
    print("Payment captured successfully")
}
Available Payment Types
swift
public enum PaymentType: String, Sendable {
    case firstPayment = "FIRST_PAYMENT"
    case secondPayment = "SECOND_PAYMENT"
    case walletTopup = "WALLET_TOPUP"
    case fundsWithdrawal = "FUNDS_WITHDRAWAL"
    case subscriptionCreated = "SUBSCRIPTION_CREATED"
    case subscriptionRenewed = "SUBSCRIPTION_RENEWED"
    case oneTime = "ONE_TIME"
    case recurring = "RECURRING"
    case `default` = "DEFAULT"
}
Available Payment Statuses
swift
public enum PaymentStatus: String, Sendable {
    case initiated = "PAYMENT_INITIATED"
    case completed = "PAYMENT_COMPLETED"
    case failed = "PAYMENT_FAILED"
    case cancelled = "PAYMENT_CANCELLED"
}
Removing Payments
Remove payment records (for refunds or cancellations):
swift
func removePayment() async {
    await LinkrunnerSDK.shared.removePayment(
        userId: "user123", // User identifier
        paymentId: "payment456" // Optional: Unique payment identifier
    )
    print("Payment removed successfully")
}
Tracking Custom Events
From iOS SDK v3.11.0, custom events automatically include the user_id you set during signup() / setUserData(). The SDK stores this identifier securely on-device (Keychain) and attaches it to every trackEvent call, so you no longer need to pass it manually. Events tracked before signup are sent without a user_id.
Events are stored for all users, including organic ones. Events from users with no matching click are stored without campaign attribution. Call .signup so events are linked to a user. You can verify your events are being captured on the Events page. For capturing revenue, it is recommended to use the .capturePayment method instead of .trackEvent.
Track custom events in your app:
swift
func trackEvent() async {
    await LinkrunnerSDK.shared.trackEvent(
        eventName: "purchase_initiated", // Event name
        eventData: [ // Optional: Event data
            "product_id": "12345",
            "category": "electronics",
            "amount": 99.99 // Include amount as a number for revenue sharing with ad networks like Google and Meta
        ],
        eventId: "order_12345" // Optional: Your own unique event identifier
    )
    print("Event tracked successfully")
}
Parameters for LinkrunnerSDK.shared.trackEvent
eventName:String(required) - Name of the event to trackeventData:[String: Any](optional) - Key-value pairs for additional event data, including Meta ecommerce propertieseventId:String(optional) - Your own unique identifier for the event, useful for deduplication and correlating with your backend
Revenue Sharing with Ad Networks
To enable revenue sharing with ad networks like Google Ads and Meta, include an amount parameter as a number in your custom event data. This allows the ad networks to optimize campaigns based on the revenue value of conversions:
swift
func trackPurchaseEvent() async {
    await LinkrunnerSDK.shared.trackEvent(
        eventName: "purchase_completed",
        eventData: [
            "product_id": "12345",
            "category": "electronics",
            "amount": 149.99 // Revenue amount as a number
        ]
    )
    print("Purchase event with revenue tracked successfully")
}
For revenue sharing with ad networks to work properly, ensure the amount parameter is passed as a number (Double or Int), not as a string.
Ecommerce Events
Minimum SDK Version: Ecommerce Event Manager requires
linkrunner-iosv3.8.0 or above. Please ensure your SDK is updated before using this feature.
If you are tracking Ecommerce events to sync with Meta or Google, you must format your eventData to include the required fields. You also need to map your custom event to the standard commerce event in the Linkrunner Dashboard.
For detailed explanations of the required fields like content_ids, contents, and value, refer to our Meta Commerce Manager documentation or Google Commerce Manager documentation.
Add To Cart Example
Use the trackEvent method to send an AddToCart event:
swift
func trackAddToCart() async {
    await LinkrunnerSDK.shared.trackEvent(
        eventName: "add_to_cart", // Map this custom event to "AddToCart" (Meta) or "add_to_cart" (Google) in the Linkrunner Dashboard
        eventData: [
            "content_ids": ["product_123"],
            "contents": [
                [
                    "id": "product_123", // Matches content_ids
                    "quantity": 1,
                    "item_price": 49.99
                ]
            ],
            "content_type": "product",
            "currency": "USD",
            "value": 49.99,
            "num_items": 1
        ]
    )
    print("Add To Cart event tracked successfully")
}
View Content Example
Use the trackEvent method to send a ViewContent event:
swift
func trackViewContent() async {
    await LinkrunnerSDK.shared.trackEvent(
        eventName: "view_item", // Map this custom event to "ViewContent" (Meta) or "view_item" (Google) in the Linkrunner Dashboard
        eventData: [
            "content_ids": ["product_123"],
            "contents": [
                [
                    "id": "product_123", // Matches content_ids
                    "quantity": 1,
                    "item_price": 49.99
                ]
            ],
            "content_type": "product",
            "currency": "USD",
            "value": 49.99,
            "num_items": 1
        ]
    )
    print("View Content event tracked successfully")
}
Payment / Purchase Example
Use the capturePayment method to send a Purchase event containing the ecommerce payload:
swift
func capturePurchase() async {
    await LinkrunnerSDK.shared.capturePayment(
        amount: 49.99,
        userId: "user123",
        paymentId: "payment_456",
        type: .firstPayment, // Map this payment type to "Purchase" (Meta) or "ecommerce_purchase" (Google) in the Linkrunner Dashboard
        status: .completed,
        eventData: [
            "content_ids": ["product_123"],
            "contents": [
                [
                    "id": "product_123", // Matches content_ids
                    "quantity": 1,
                    "item_price": 49.99
                ]
            ],
            "content_type": "product",
            "currency": "USD",
            "value": 49.99,
            "num_items": 1,
            "order_id": "order_abc123" // Required for Purchase events
        ]
    )
    print("Purchase captured successfully")
}
Note: For more information on testing and verifying your ecommerce events, please see our Meta Commerce Manager or Google Commerce Manager guide.
Enhanced Privacy Controls
The SDK offers options to enhance user privacy:
swift
// Enable PII (Personally Identifiable Information) hashing
LinkrunnerSDK.shared.enablePIIHashing(true)

// Check if PII hashing is enabled
let isHashingEnabled = LinkrunnerSDK.shared.isPIIHashingEnabled()
When PII hashing is enabled, sensitive user data like name, email, and phone number are hashed using SHA-256 before being sent to Linkrunner servers.
Uninstall Tracking
Before you begin
Here's what you need to know before getting started:
Requirements:
- iOS SDK 3.4.0 and later
- Registering your app with APNs
iOS
Connect APNs with Linkrunner
Apple Developer Portal
Get the required credentials from the Apple Developer Portal:
APNs Authentication Key (p8) and Key ID:
- Go to the Apple Developer Portal.
- Select Identifiers under Certificates, IDs & Profiles.
- Click on the app you want to track uninstalls for. Then, under Capabilities, search for Push Notifications and enable it.
- Under Certificates, IDs & Profiles, select Keys and click on plus (+) icon to create a key. Enable APNs when creating the key and download the key file (p8).
- The Key ID can be found in the Keys tab.
Bundle ID and Team ID:
- Under Identifiers, click on your app and you will see the Bundle ID and Team ID (App ID Prefix).
Linkrunner Dashboard
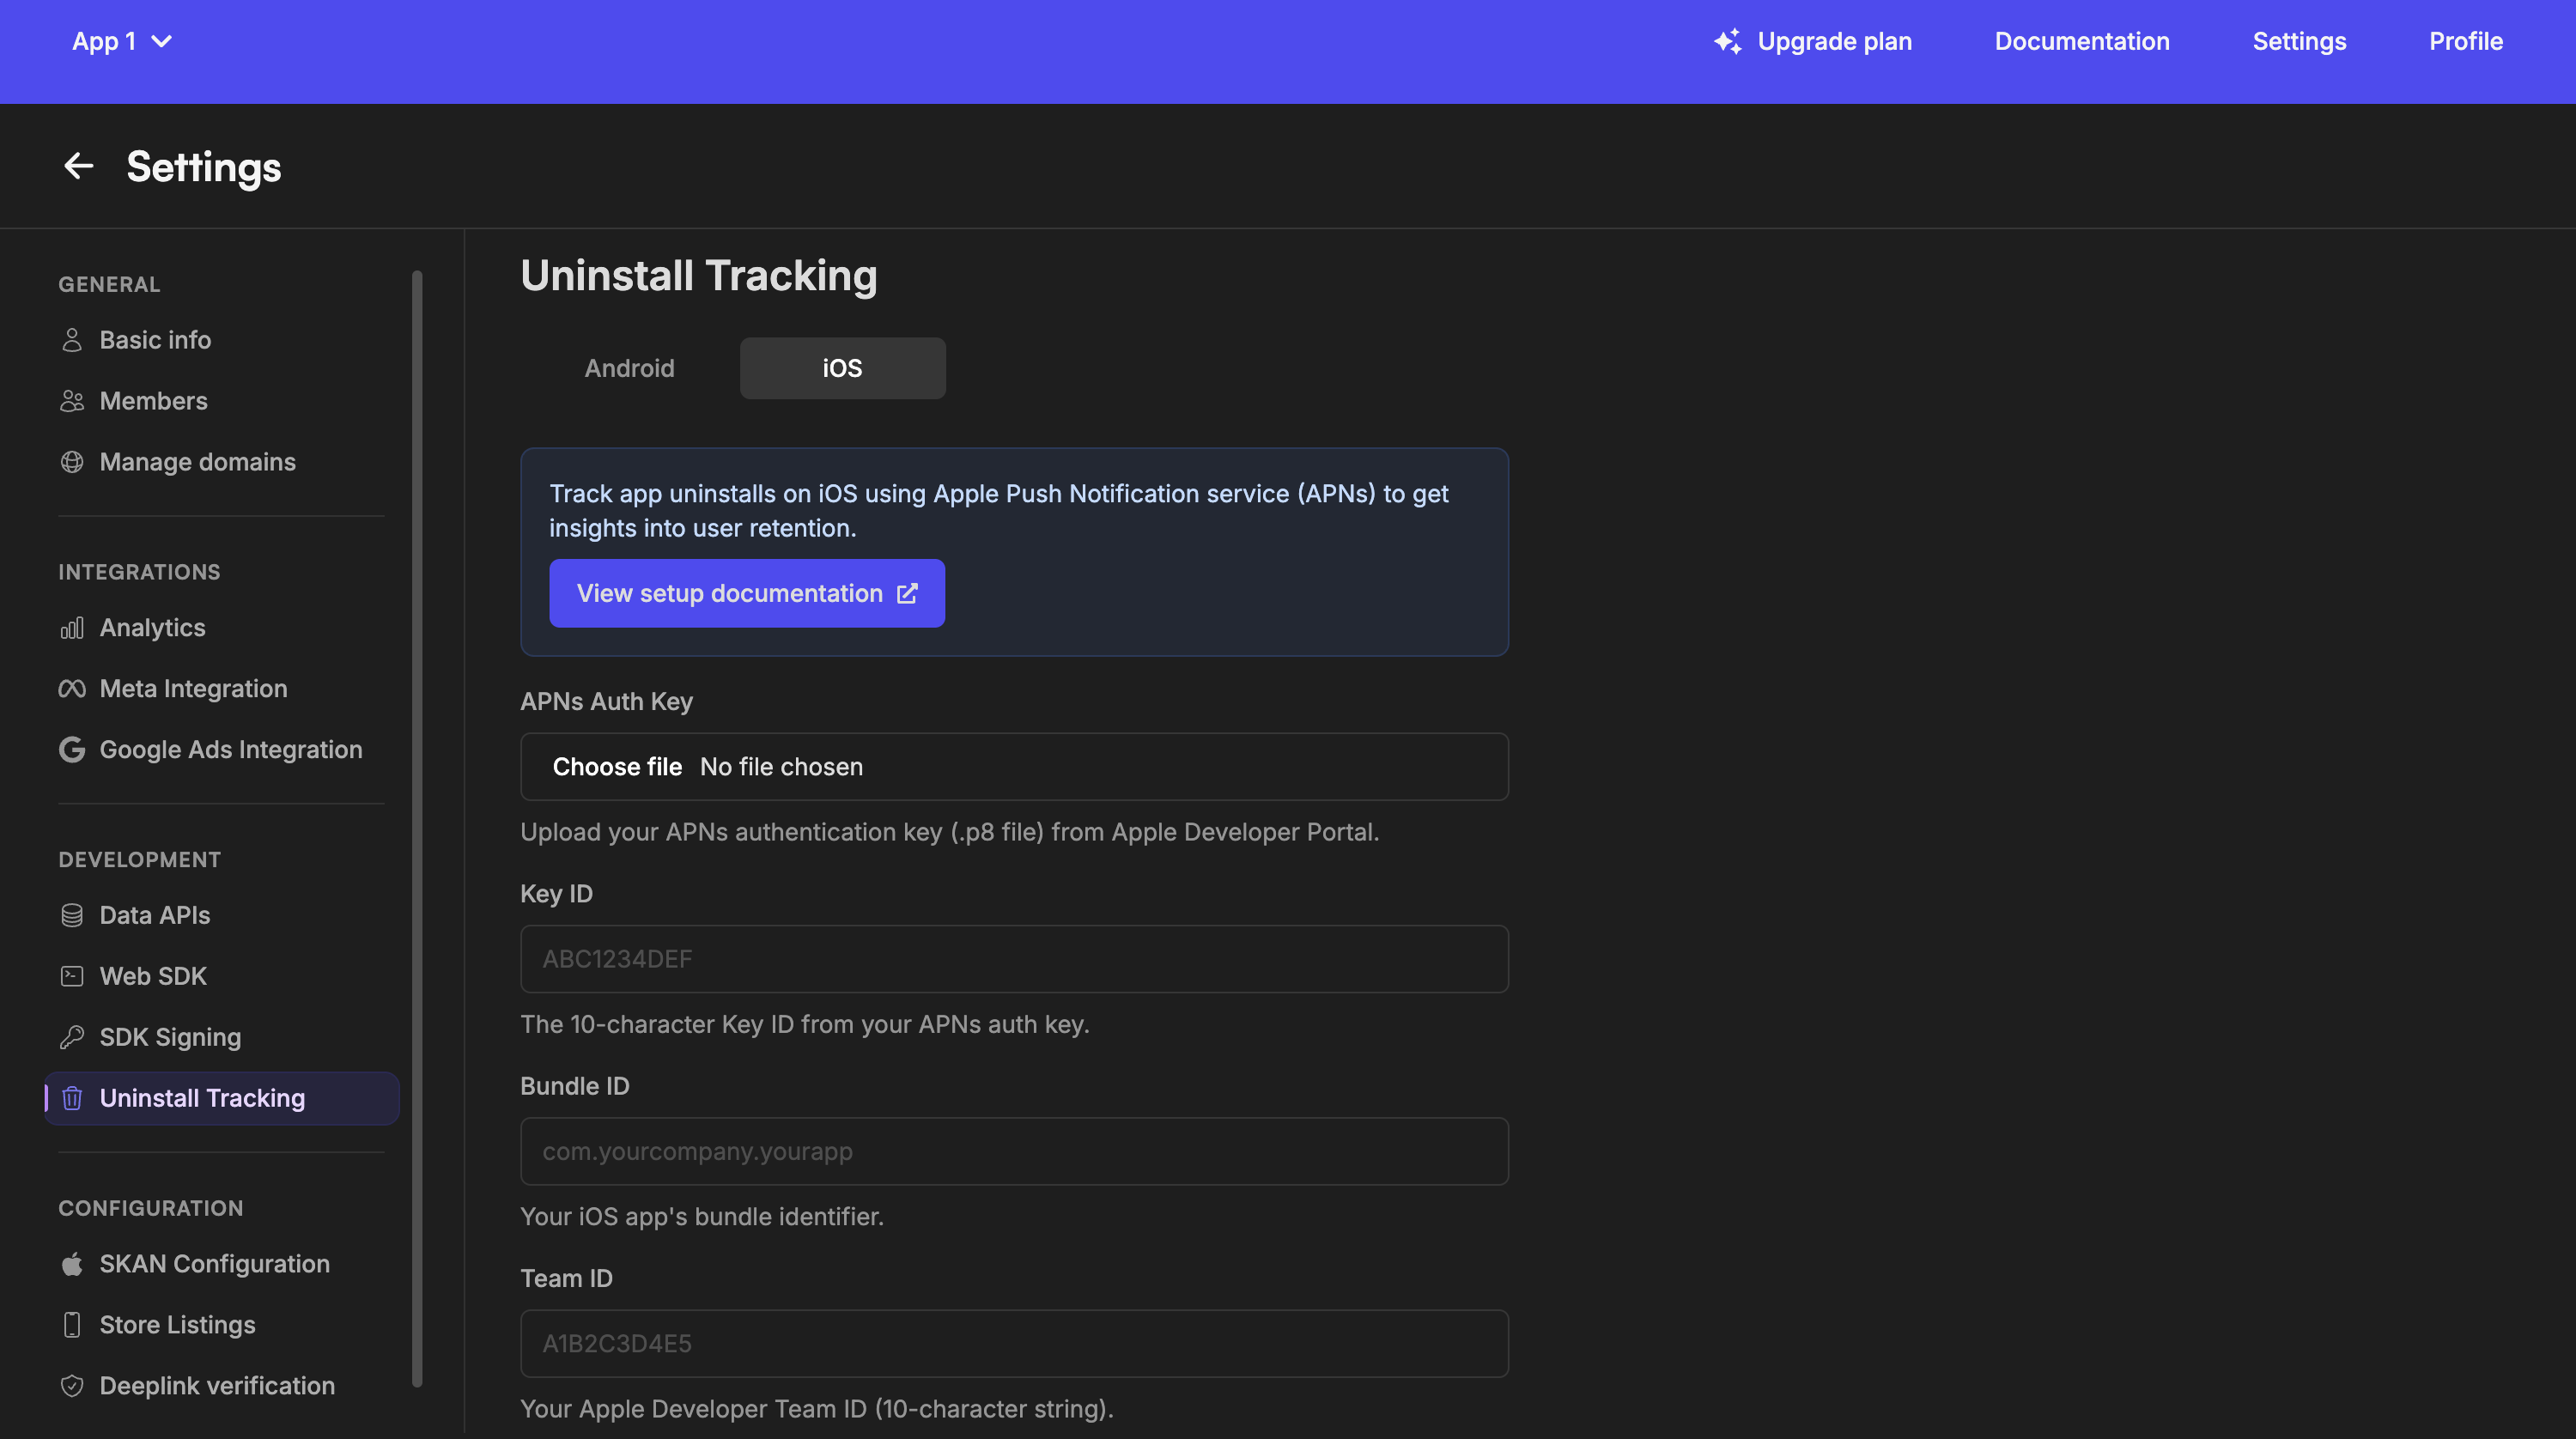
- In Linkrunner, go to Settings > Uninstall Tracking.
- Under the iOS tab, upload the APNs Authentication Key (p8) file and enter the Key ID, Bundle ID and Team ID (App ID Prefix) that you copied from the Apple Developer Portal.
Integrate with Linkrunner SDK
Follow these instructions to integrate APNs with the Linkrunner SDK:
- Set up Push Notifications:
Enable push notifications in your Xcode project by adding the Push Notifications capability.
- Configure your app to provide the device's APNs token to the Linkrunner SDK.
swift
import UIKit
import LinkrunnerKit

class AppDelegate: UIResponder, UIApplicationDelegate {

    func application(_ application: UIApplication, didFinishLaunchingWithOptions launchOptions: [UIApplication.LaunchOptionsKey: Any]?) -> Bool {
        // Request push notification permissions
        UNUserNotificationCenter.current().requestAuthorization(options: [.alert, .badge, .sound]) { granted, error in
            if granted {
                DispatchQueue.main.async {
                    application.registerForRemoteNotifications()
                }
            }
        }
        return true
    }

    // Called when APNs token is received
    func application(_ application: UIApplication, didRegisterForRemoteNotificationsWithDeviceToken deviceToken: Data) {
        let tokenString = deviceToken.map { String(format: "%02.2hhx", $0) }.joined()
        Task {
            try? await LinkrunnerSDK.shared.setPushToken(tokenString)
        }
    }

    func application(_ application: UIApplication, didFailToRegisterForRemoteNotificationsWithError error: Error) {
        print("Failed to register for remote notifications: \(error)")
    }
}
For SwiftUI apps using the new app lifecycle:
swift
import SwiftUI
import LinkrunnerKit

@main
struct MyApp: App {
    @UIApplicationDelegateAdaptor(AppDelegate.self) var appDelegate

    var body: some Scene {
        WindowGroup {
            ContentView()
        }
    }
}

class AppDelegate: NSObject, UIApplicationDelegate {
    func application(_ application: UIApplication, didFinishLaunchingWithOptions launchOptions: [UIApplication.LaunchOptionsKey: Any]?) -> Bool {
        UNUserNotificationCenter.current().requestAuthorization(options: [.alert, .badge, .sound]) { granted, error in
            if granted {
                DispatchQueue.main.async {
                    application.registerForRemoteNotifications()
                }
            }
        }
        return true
    }

    func application(_ application: UIApplication, didRegisterForRemoteNotificationsWithDeviceToken deviceToken: Data) {
        let tokenString = deviceToken.map { String(format: "%02.2hhx", $0) }.joined()
        Task {
            try? await LinkrunnerSDK.shared.setPushToken(tokenString)
        }
    }
}
Function Placement Guide
| Function | Requirement | Where to Place | When to Call |
|---|---|---|---|
LinkrunnerSDK.shared.initialize | Required | App initialization | Once when app starts |
LinkrunnerSDK.shared.signup | Required | Identification flow (signup or login) | Once when the user is identified |
LinkrunnerSDK.shared.setCustomerUserId | Required | App initialization or identification flow | After initialize, as soon as your user ID is available |
LinkrunnerSDK.shared.handleDeeplink | Required | SceneDelegate deep link entry points | When app is opened via a deep link |
LinkrunnerSDK.shared.getAttributionData | Optional | Attribution data handling flow | Whenever the attribution data is needed |
LinkrunnerSDK.shared.setAdditionalData | Optional | Integration code | When third-party integration IDs are available |
LinkrunnerSDK.shared.setUserData | Optional | Authentication or profile update logic | After signup, when additional user details become available |
LinkrunnerSDK.shared.trackEvent | Optional | Throughout app | When specific user actions occur, including ecommerce events |
LinkrunnerSDK.shared.capturePayment | Optional | Payment processing | When user makes a payment, including ecommerce purchases |
LinkrunnerSDK.shared.removePayment | Optional | Refund flow | When payment needs to be removed |
LinkrunnerSDK.shared.setPushToken | Optional | Push notification setup | When APNs token is available |
LinkrunnerSDK.shared.setConsent | Optional | App initialization or consent flow | Before initialize, and again when consent changes |
LinkrunnerSDK.shared.enablePIIHashing | Optional | Privacy settings | When you want to enable PII hashing |
LinkrunnerSDK.shared.isPIIHashingEnabled | Optional | Privacy settings or compliance checks | When you need to check PII hashing status |
Complete Example
Here's a simplified example showing how to integrate Linkrunner in a SwiftUI iOS app:
You can find your project token here.
swift
import SwiftUI
import LinkrunnerKit

@main
struct MyApp: App {
    init() {
        Task {
            await initializeLinkrunner()
        }
    }

    func initializeLinkrunner() async {
        await LinkrunnerSDK.shared.initialize(token: "YOUR_PROJECT_TOKEN")
        print("Linkrunner initialized successfully")
    }

    var body: some Scene {
        WindowGroup {
            ContentView()
        }
    }
}

struct ContentView: View {
    var body: some View {
        NavigationView {
            VStack(spacing: 20) {
                Text("Linkrunner Demo")
                    .font(.largeTitle)

                Button("Track Event") {
                    Task {
                        await trackCustomEvent()
                    }
                }
                .buttonStyle(.borderedProminent)
            }
            .padding()
        }
    }

    func trackCustomEvent() async {
        await LinkrunnerSDK.shared.trackEvent(
            eventName: "button_clicked",
            eventData: ["screen": "home"]
        )
        print("Event tracked successfully")
    }
}
Next Steps
Test Your Integration
Validate your setup end-to-end
Set Up Deep Linking
Configure deep links for your app
Support
If you encounter issues during integration, contact us at support@linkrunner.io.