

Appearance
Shopify app
Track visitors, campaigns, sign-ups, and purchases on a Shopify store with the Linkrunner Web SDK
Shopify stores need the Web SDK installed in two places, because Shopify does not allow scripts on the checkout and thank-you pages. Your storefront gets a script tag; your checkout gets a custom pixel.
Once both are in, every sign-up and purchase is linked back to the ad, campaign, or link that brought the shopper in.
This takes about 30 minutes and needs no developer access to your servers. Everything is done from your Shopify admin.
Before you start
Check where your checkout runs
Go to Settings → Domains in your Shopify admin. Your checkout must run on your own domain (for example checkout pages under yourstore.com) for the purchase to be linked to the shopper's browsing session.
Most Shopify stores are already set up this way. If your checkout runs on yourstore.myshopify.com while your storefront is on yourstore.com, Step 2 below is required rather than optional.
Get your Web SDK token
Web attribution is in beta, so tokens are issued by us. Email support@linkrunner.io with your project name and store domain, and we'll send you a Web SDK token.
Back up your theme
Steps 1 to 3 edit your theme's code. In Online Store → Themes, use Actions → Duplicate on your live theme first, so you can roll back instantly.
Installation
Add the SDK to your theme
Go to Online Store → Themes → ⋯ → Edit code and open layout/theme.liquid.
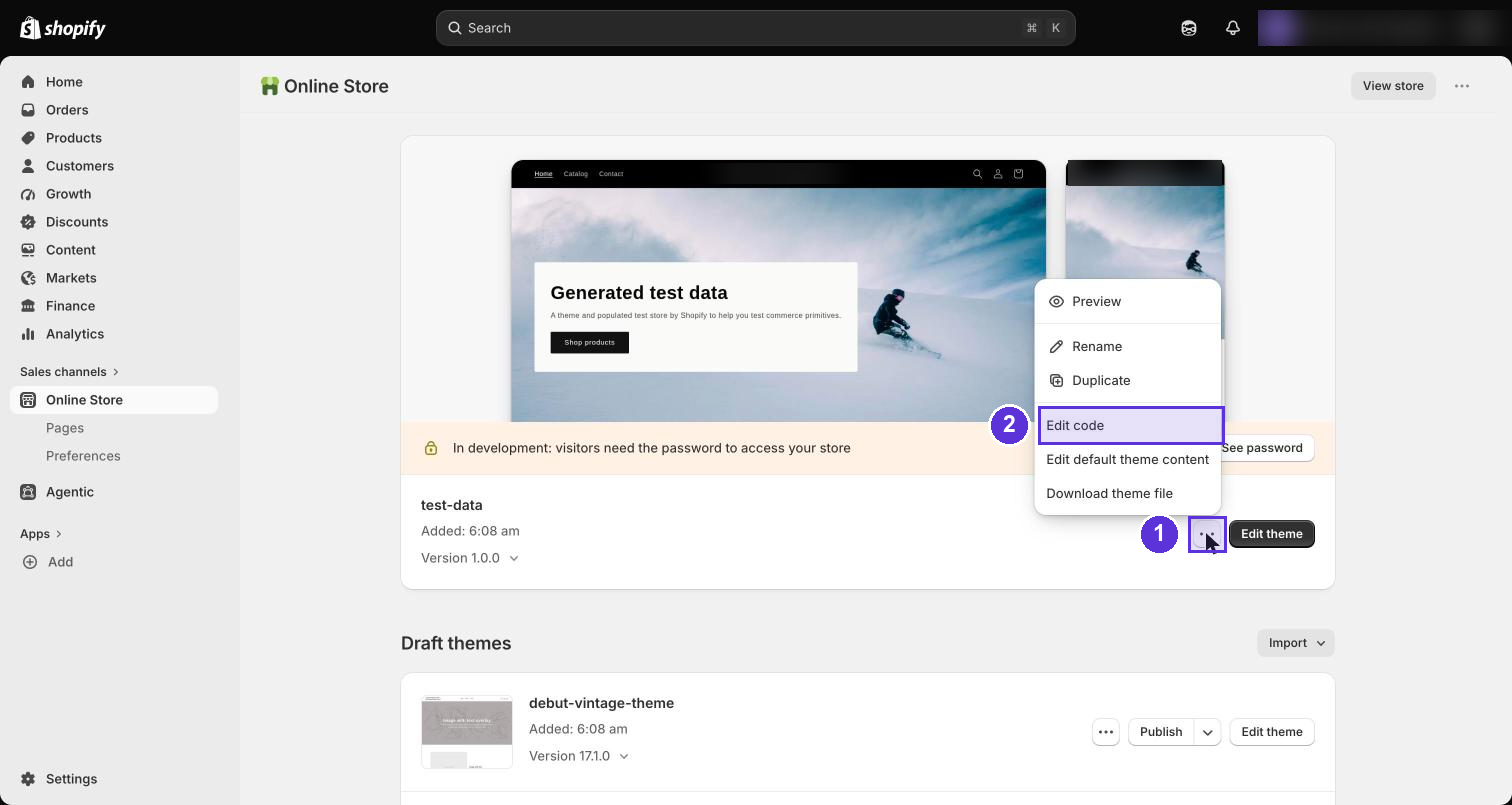
Paste this immediately before the closing </head> tag, replacing YOUR_WEB_SDK_TOKEN:
html
<script src="https://cdn.linkrunner.io/web/v1/lr.js" data-token="YOUR_WEB_SDK_TOKEN" defer></script>Click Save. This tracks page views, traffic sources, campaigns, and ad clicks across your storefront. The URL always serves the latest SDK, so you never need to update this tag.
Pass the visitor ID into the cart
In the same layout/theme.liquid file, paste this directly below the script you just added:
html
<script>
    document.addEventListener("DOMContentLoaded", function () {
        var vid = localStorage.getItem("lr_vid");
        if (!vid) return;
        fetch("/cart/update.js", {
            method: "POST",
            headers: { "Content-Type": "application/json" },
            body: JSON.stringify({ attributes: { lr_vid: vid } }),
        }).catch(function () {});
    });
</script>
This attaches the visitor's ID to their cart so the purchase can still be matched if checkout happens on a different domain, which is what Shop Pay does. Click Save.
Strictly optional if your checkout is on your own domain and you don't use Shop Pay. We recommend adding it anyway: it costs nothing and removes a whole class of missing-attribution problems.
Track sign-ups
Shopify has no sign-up event that a pixel can read, so your theme sends one. In the same layout/theme.liquid file, paste this directly below the cart snippet:
liquid
{% if customer %}
<script>
    document.addEventListener("DOMContentLoaded", function () {
        var id = String({{ customer.id }});
        if (localStorage.getItem("lr_signup") === id) return;
        lr.identify(id);
        lr.track("signup", {
            name: {{ customer.name | json }},
            email: {{ customer.email | json }},
            phone: {{ customer.phone | json }}
        });
        localStorage.setItem("lr_signup", id);
    });
</script>
{% endif %}
Click Save. The first time a signed-in customer views your store in a browser, this sets their Shopify customer ID as their Linkrunner user ID and records one signup event with their name, email, and phone. Every later event from that browser, including their purchases, carries the same user ID.
Shopify signs customers in with a one-time email code and creates the account on first use, so the first sign-in in each browser is recorded as the sign-up. The Unique Users column in Web Events counts each customer once, even if they sign in on several devices.
This step and the checkout pixel send your customers' email and phone to Linkrunner. They are what link a sign-up or purchase to an identifiable person, so audience exports and person-level reporting depend on them.
Make sure your privacy notice covers sharing customer contact details with Linkrunner and your data processing agreement with us is in place. If you would rather not send them, delete the email and phone lines here and in the pixel. Attribution, campaign reporting, and revenue all work without them; you lose person-level audiences.
Add the checkout pixel
Go to Settings → Customer events → Add custom pixel. Name it Linkrunner.
This is a new, separate pixel. Do not paste this code into a pixel you already have. Each custom pixel runs in its own sandbox, so any existing pixels (Google Analytics, Meta, and so on) keep working and should be left untouched.
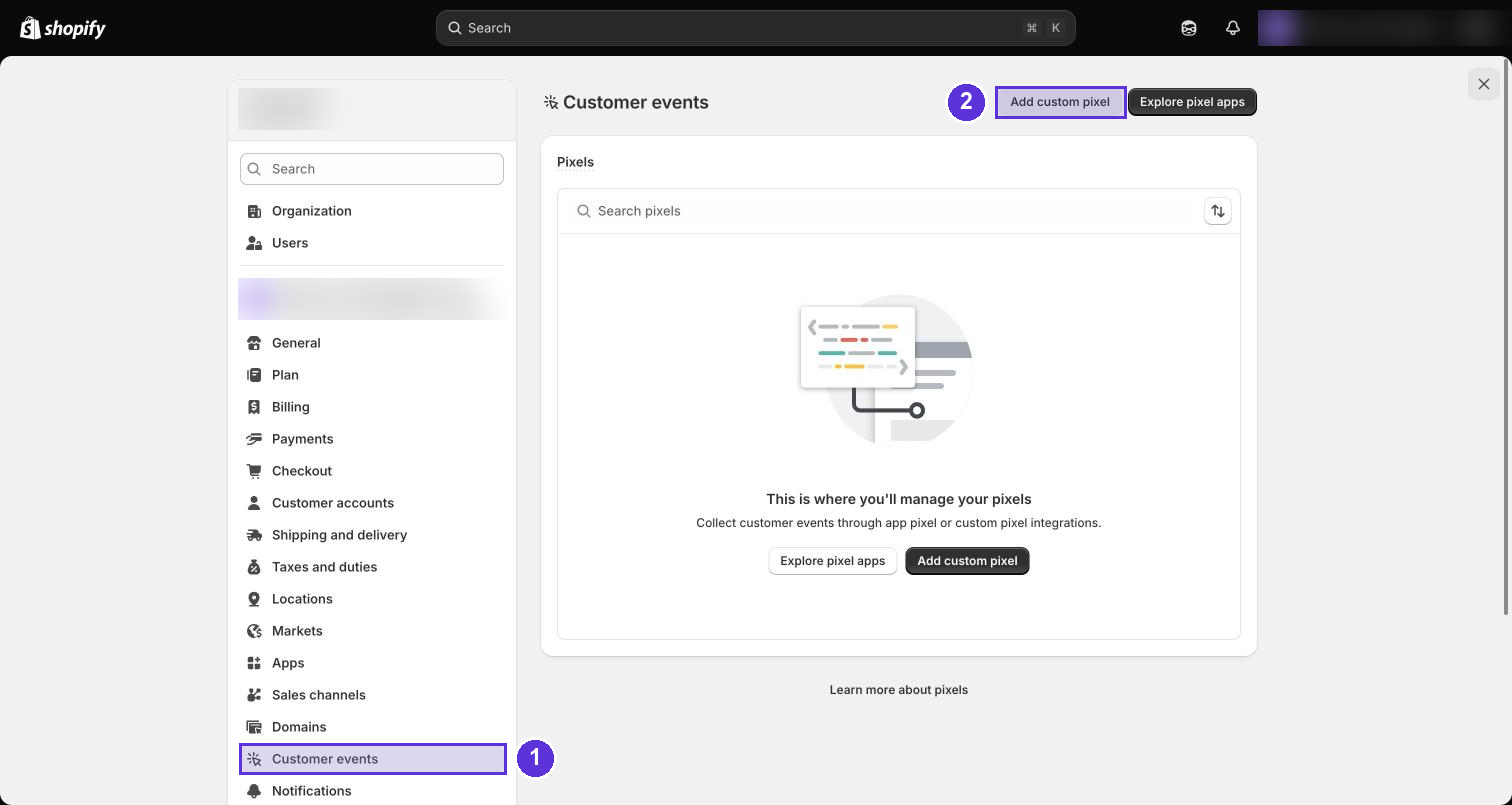
The code box arrives pre-filled with Shopify's commented placeholder starting // Step 1. Initialize the JavaScript pixel SDK. Select all of it and delete it, then paste the code below and replace YOUR_WEB_SDK_TOKEN with the token you used in Step 1.
js
var LR_TOKEN = "YOUR_WEB_SDK_TOKEN";
var DEFAULT_ENDPOINT = "https://api.linkrunner.io/web/ingest";
var LAST_TOUCH_MS = 24 * 60 * 60 * 1000;
var UTM_KEYS = ["utm_source", "utm_medium", "utm_campaign", "utm_id", "utm_term", "utm_content"];

async function context() {
    try { return JSON.parse(await browser.localStorage.getItem("lr_ctx")) || {}; } catch (e) { return {}; }
}

async function send(endpoint, payload) {
    var res = await fetch(endpoint, {
        method: "POST",
        headers: { "Content-Type": "application/json" },
        body: JSON.stringify(payload),
        keepalive: true,
    });
    if (!res.ok) throw new Error("status " + res.status);
}

analytics.subscribe("checkout_completed", async (event) => {
    try {
        var checkout = event.data.checkout || {};
        var ctx = await context();
        var fields = Object.assign({}, ctx.fields);

        if (!ctx.t || Date.now() - ctx.t > LAST_TOUCH_MS) {
            UTM_KEYS.forEach(function (k) { delete fields[k]; });
        }

        var payload = Object.assign(fields, {
            token: LR_TOKEN,
            event_id: "lr-" + Date.now().toString(36) + "-" + Math.random().toString(36).slice(2, 10),
            event_type: "custom",
            event_name: "purchase",
            event_data: {
                value: Number(checkout.totalPrice && checkout.totalPrice.amount) || 0,
                currency: checkout.currencyCode || "",
                order_id: (checkout.order && checkout.order.id) || "",
                email: checkout.email || "",
                phone: checkout.phone || "",
            },
            page_url: event.context.document.location.href,
            client_timestamp: new Date().toISOString(),
        });

        if (!payload.visitor_id) {
            (checkout.attributes || []).forEach(function (a) {
                if (a.key === "lr_vid") payload.visitor_id = a.value || "";
            });
        }

        var endpoint = ctx.endpoint || DEFAULT_ENDPOINT;
        await send(endpoint, payload).catch(function () {
            if (endpoint !== DEFAULT_ENDPOINT) return send(DEFAULT_ENDPOINT, payload);
        });
    } catch (e) {}
});
The pixel reads the visitor, customer, and campaign that the SDK saved on your storefront, and sends the purchase to the same place the SDK does. If you set up your own subdomain, purchases use it without any change to this code.
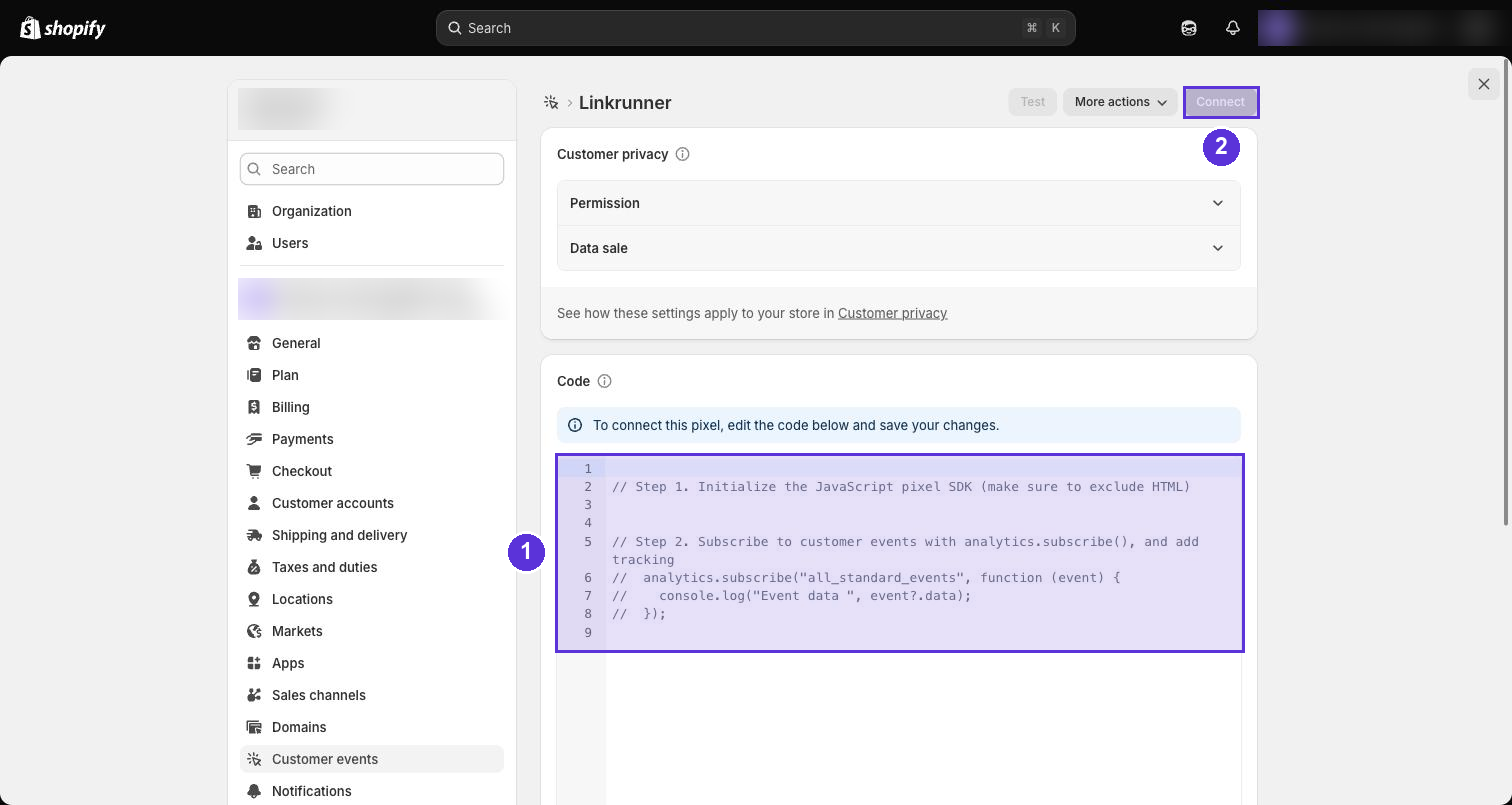
The empty catch at the end is deliberate. A custom pixel must never throw, because an error there can interrupt the checkout. Failures are swallowed silently, which is why you verify with the steps below rather than by watching for errors.
Above the code box, check the two Customer privacy settings. The defaults are already right for Linkrunner, so in most cases you are confirming rather than changing:
- Permission: leave Required selected, with Marketing and Analytics ticked. Analytics covers page views and sessions; Marketing covers the ad click IDs and campaign data that attribution depends on. Preferences is unused, leave it unticked.
- Data sale: leave Data collected qualifies as data sale selected. The pixel then stops collecting for shoppers who opt out of having their data sold.
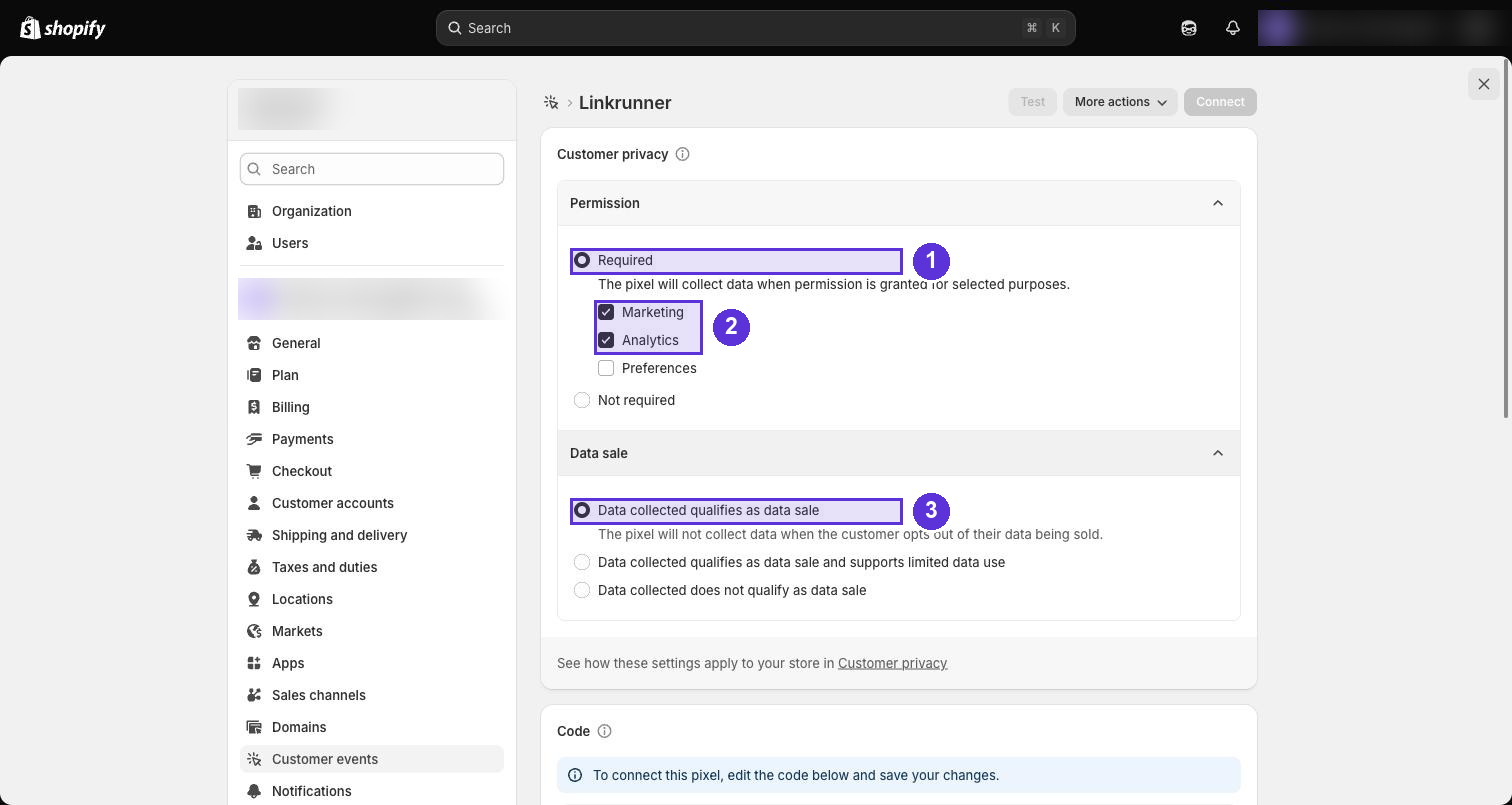
Choosing Not required makes the pixel collect regardless of consent. That is a legal decision about the markets you sell in, not a technical one. Check with whoever handles privacy at your company before changing it.
Click Save, then click Connect.
Save and Connect are two separate actions. A saved but unconnected pixel looks installed and never runs. This is the single most common reason purchases don't appear.
Verify it works
- Open a private browser window and visit your store with test campaign parameters, for example
https://yourstore.com/?utm_source=meta&utm_medium=cpc&utm_campaign=test - Sign in to a customer account on your store
- Browse a product, add it to the cart, and complete a real order
- Open Web Events in your Linkrunner dashboard
You should see page views for the visit, one sign-up, and a purchase event carrying the order value, all attributed to utm_campaign=test.
Refund the test order afterwards. Refunding does not remove the tracked event, which is what you want, because you are confirming tracking, not revenue.
Function Placement Guide
Shopify uses the Web SDK: loading the script initializes it, identify sets the customer user ID, and track('signup', ...) records signup. Incoming URL attribution is automatic; there is no handleDeeplink method.
| Function | Requirement | Where to Place | When to Call |
|---|---|---|---|
| SDK script | Required | layout/theme.liquid, before </head> | Once on each storefront page load |
lr.track('signup', ...) | Required | Sign-up snippet in layout/theme.liquid | Once per signed-in customer in each browser |
lr.identify | Required | Sign-up snippet, before the signup event | When the signed-in Shopify customer ID is available |
lr.track | Optional | Storefront event handlers | When you record other shopper actions |
Follow all installation steps for checkout tracking. The checkout pixel is separate from the storefront SDK calls above.
Track custom events
Use lr.track to record other actions on your storefront, such as clicks on a button or link. Paste the code in layout/theme.liquid, below the snippets from the steps above.
This example records a catalog_click event each time a shopper clicks a link to your catalog:
html
<script>
    document.addEventListener("click", function (e) {
        if (e.target.closest('a[href*="/collections/all"]')) {
            lr.track("catalog_click", { page: location.pathname });
        }
    });
</script>
To find the value for your own button or link, right-click it on your store, choose Inspect, and copy part of its href. To track another element, add another if block inside the same listener with its own event name:
js
if (e.target.closest('a[href*="/pages/contact"]')) {
    lr.track("contact_click", { page: location.pathname });
}
Don't use signup or purchase as custom event names. Those names feed the Sign-ups and Purchases columns.
To see an event in Web Events, click the columns icon above the table, click Custom Event, select your event, and click Save. The column shows how many times the event fired. If a new event isn't in the list yet, reload the page.
Collect from your own subdomain
Some ad blockers stop requests to api.linkrunner.io. You can send events through a subdomain of your store instead, such as lr.yourstore.com. The setup above works without this.
Register the subdomain
Open Manage Domains in your Linkrunner dashboard and add the subdomain, such as lr.yourstore.com.
Add the DNS record
Add a CNAME record for the subdomain that points to api.linkrunner.io:
text
lr.yourstore.com. CNAME api.linkrunner.io.If Shopify manages your domain, add it from Settings → Domains in your Shopify admin, under your domain's DNS settings. Otherwise, add it with your DNS provider. On Cloudflare, set the record to DNS only.
Linkrunner issues the HTTPS certificate on the first request to a registered subdomain.
Add the subdomain to your theme
In layout/theme.liquid, add data-domain to the script tag from Step 1:
html
<script src="https://cdn.linkrunner.io/web/v1/lr.js" data-token="YOUR_WEB_SDK_TOKEN" data-domain="lr.yourstore.com" defer></script>Click Save. The checkout pixel picks up the subdomain from the SDK, so the pixel does not change.
Verify the subdomain
Open your store, then in your browser's Network tab filter by ingest. Requests should go to https://lr.yourstore.com/web/ingest and return 204.
If each event sends one request to your subdomain and another to api.linkrunner.io, the subdomain isn't reachable yet and the SDK is using its fallback. Check the CNAME record and that the subdomain is registered in Manage Domains.
Limitations and constraints
Please read these before going live. Most are Shopify platform behaviour, not Linkrunner settings, and cannot be worked around.
Shop Pay checkouts run on a different domain
When a shopper checks out with Shop Pay, the checkout is served by shop.app, not your store. Browser security prevents the pixel from reading anything your storefront saved.
The cart-attribute snippet in Step 2 is what keeps these purchases attributed. If you use Shop Pay, Step 2 is required.
The pixel only runs on your published theme
Custom pixels do not run in theme preview links. Test on the published theme, or your purchase events will never fire.
Customer privacy settings can block the pixel
If your store uses Shopify's customer privacy controls, a custom pixel will not run until the visitor grants the consent category the pixel is assigned to.
If you see page views but no purchases, check the pixel's Permission setting under Settings → Customer events first.
Password-protected stores
Development stores and stores behind a password page keep the storefront gated. Enter the password first, then navigate to your campaign URL. Otherwise Shopify strips the campaign parameters during the redirect and the visit records with no campaign.
Safari clears stored data after 7 days
Safari deletes browser storage written by scripts after 7 days of inactivity. A Safari visitor who first arrives from an ad and returns more than a week later will be counted as a new visitor.
This affects all web analytics tools equally and is not specific to Linkrunner.
Ad-blockers and tracking prevention
Some browser extensions block analytics requests. Expect a small gap between Shopify's own order count and the purchases recorded here. Shopify's admin remains the source of truth for revenue. To reduce the gap, collect from your own subdomain.
SDK updates need no changes
The cdn.linkrunner.io URL in Step 1 always serves the current SDK, so there is nothing to install or keep updated. The snippets and pixel on this page keep working across SDK updates. If you load the SDK from somewhere else, use v0.1.17 or later, which is the first version the checkout pixel can read attribution from.
Troubleshooting
No events at all
Open your storefront, press F12, and in the Network tab filter by ingest. Requests go to api.linkrunner.io, or to your subdomain if you set one up.
- No requests: the script tag is missing or the theme wasn't saved
401responses: wrong token. Confirm you used the Web SDK token
Page views appear but purchases don't
In order of likelihood:
- The pixel was saved but never Connected
- Customer privacy settings are blocking it (see Limitations)
- You tested on a theme preview instead of the published theme
- The token in the pixel doesn't match the one in the theme
Purchases appear but show no campaign
Usually Shop Pay. Confirm the Step 2 cart snippet is installed and saved, then place a fresh test order, because existing carts won't have the attribute attached.
Sign-ups don't appear
The snippet records a sign-up once per browser, on the first storefront page a signed-in customer views. If you already signed in with that browser, test in a private window. Also confirm the Step 3 snippet is in layout/theme.liquid and the theme was saved.
Revenue is missing or zero
Check that your products have prices set. The pixel reads the order total directly from Shopify's checkout data, so a zero total means a zero-priced order.
What gets tracked
| Where | What |
|---|---|
| Storefront pages | Page views, traffic source, campaign, ad click IDs, first and last touch |
| Cart | Visitor ID attached for checkout matching |
| Signed-in customers | One signup event per browser with the customer's name, email, and phone, and their Shopify customer ID as the user ID |
| Checkout | purchase event with order value, currency, order ID, and the customer's email and phone (used for person-level audiences) |
| Your own events | Any action you record with lr.track |
Need help? Contact support@linkrunner.io